8502 字
11 分钟
18 次
- 2026-09-20
MCP 介绍
介绍 MCP
MCP (Model Context Protocol)叫做模型上下文协议,它是一个通信层,主要目的是为大语言模型(LLM)提供调用外部接口的规范,大语言模型能够以统一、标准化的方式连接外部工具、数据源和服务。
Claude 中的说法是,为大模型提供服务调用的上下文和工具,让自己不需要编写和维护繁琐的集成代码,将工具定义和执行的负担从自己的服务转移到专门的 MCP 服务。
其工作原理就是,围绕外部服务,将大量外部服务的功能打包起来,并将其作为一组标准化的工具公开,让 LLM 直接连接到这个 MCP 服务器,而不是从头开始实现所有调用功能。
MCP Client ,或者叫 MCP 客户端,是充当本机服务与 MCP 服务器之间的通信桥梁,是访问 MCP 服务器提供所有工具的入口,负责处理消息交换与协议细节。
MCP 是一个传输无关的通信,客户端可以使用不同的协议进行通信,例如 HTTP、WebSocket 等等。
MCP 客户端与服务器会交换 MCP 规范中定义的特定消息类型,例如:
- ListToolsRequest/ListToolsResult:客户端向服务器询问可以提供哪些工具
- CallToolRequest/CallToolResult:客户端要求服务器使用给定的参数运行特定的程序,然后接收结果。
定义 MCP 服务端
创建一个 mcp_simple_server.py 文件:
pythonfrom mcp.server.mcpserver import MCPServer from pydantic import Field # 初始化 MCP 服务器 mcp = MCPServer("DocumentMCP", log_level="ERROR") # 模拟数据源 docs = { "deposition.md": "This deposition covers the testimony of Angela Smith, P.E.", "report.pdf": "The report details the state of a 20m condenser tower.", "financials.docx": "These financials outline the project's budget and expenditures", "outlook.pdf": "This document presents the projected future performance of the system", "plan.md": "The plan outlines the steps for the project's implementation.", "spec.txt": "These specifications define the technical requirements for the equipment" } # 定义一个读取文件内容的工具 @mcp.tool( name="read_doc_contents", description="Read the contents of a document and return it as a string" ) def read_document( doc_id: str = Field(description="Id os the document to read") ): if doc_id not in docs: raise ValueError(f"Doc with id {doc_id} not found") return docs[doc_id] # 定义一个编辑文件内容的工具 @mcp.tool( name="edit_document", description="Edit a document by replacing a string in the documents content with a new string." ) def edit_document( doc_id: str = Field(description="Id of the document that will be edited"), old_str: str = Field(description="The text to replace. Must match exactly, including whitespace."), new_str: str = Field(description="The new text to insert in place of the old text.") ): if doc_id not in docs: raise ValueError(f"Doc with id {doc_id} not found") docs[doc_id] = docs[doc_id].replace(old_str, new_str)
接下来启动 MCP 检查器(MCP Inspector),启动之前,需要在虚拟环境中装一个 uv:
shellpip install uv

mcp dev .\mcp_simple_server.py
启动以后,自动跳转到网页,记得点击 Connect 开关,启动 MCP 服务器,出现 Connected 之后,就说明启动成功了,此时顶部会出现 Servers、Tools 这四个标签。
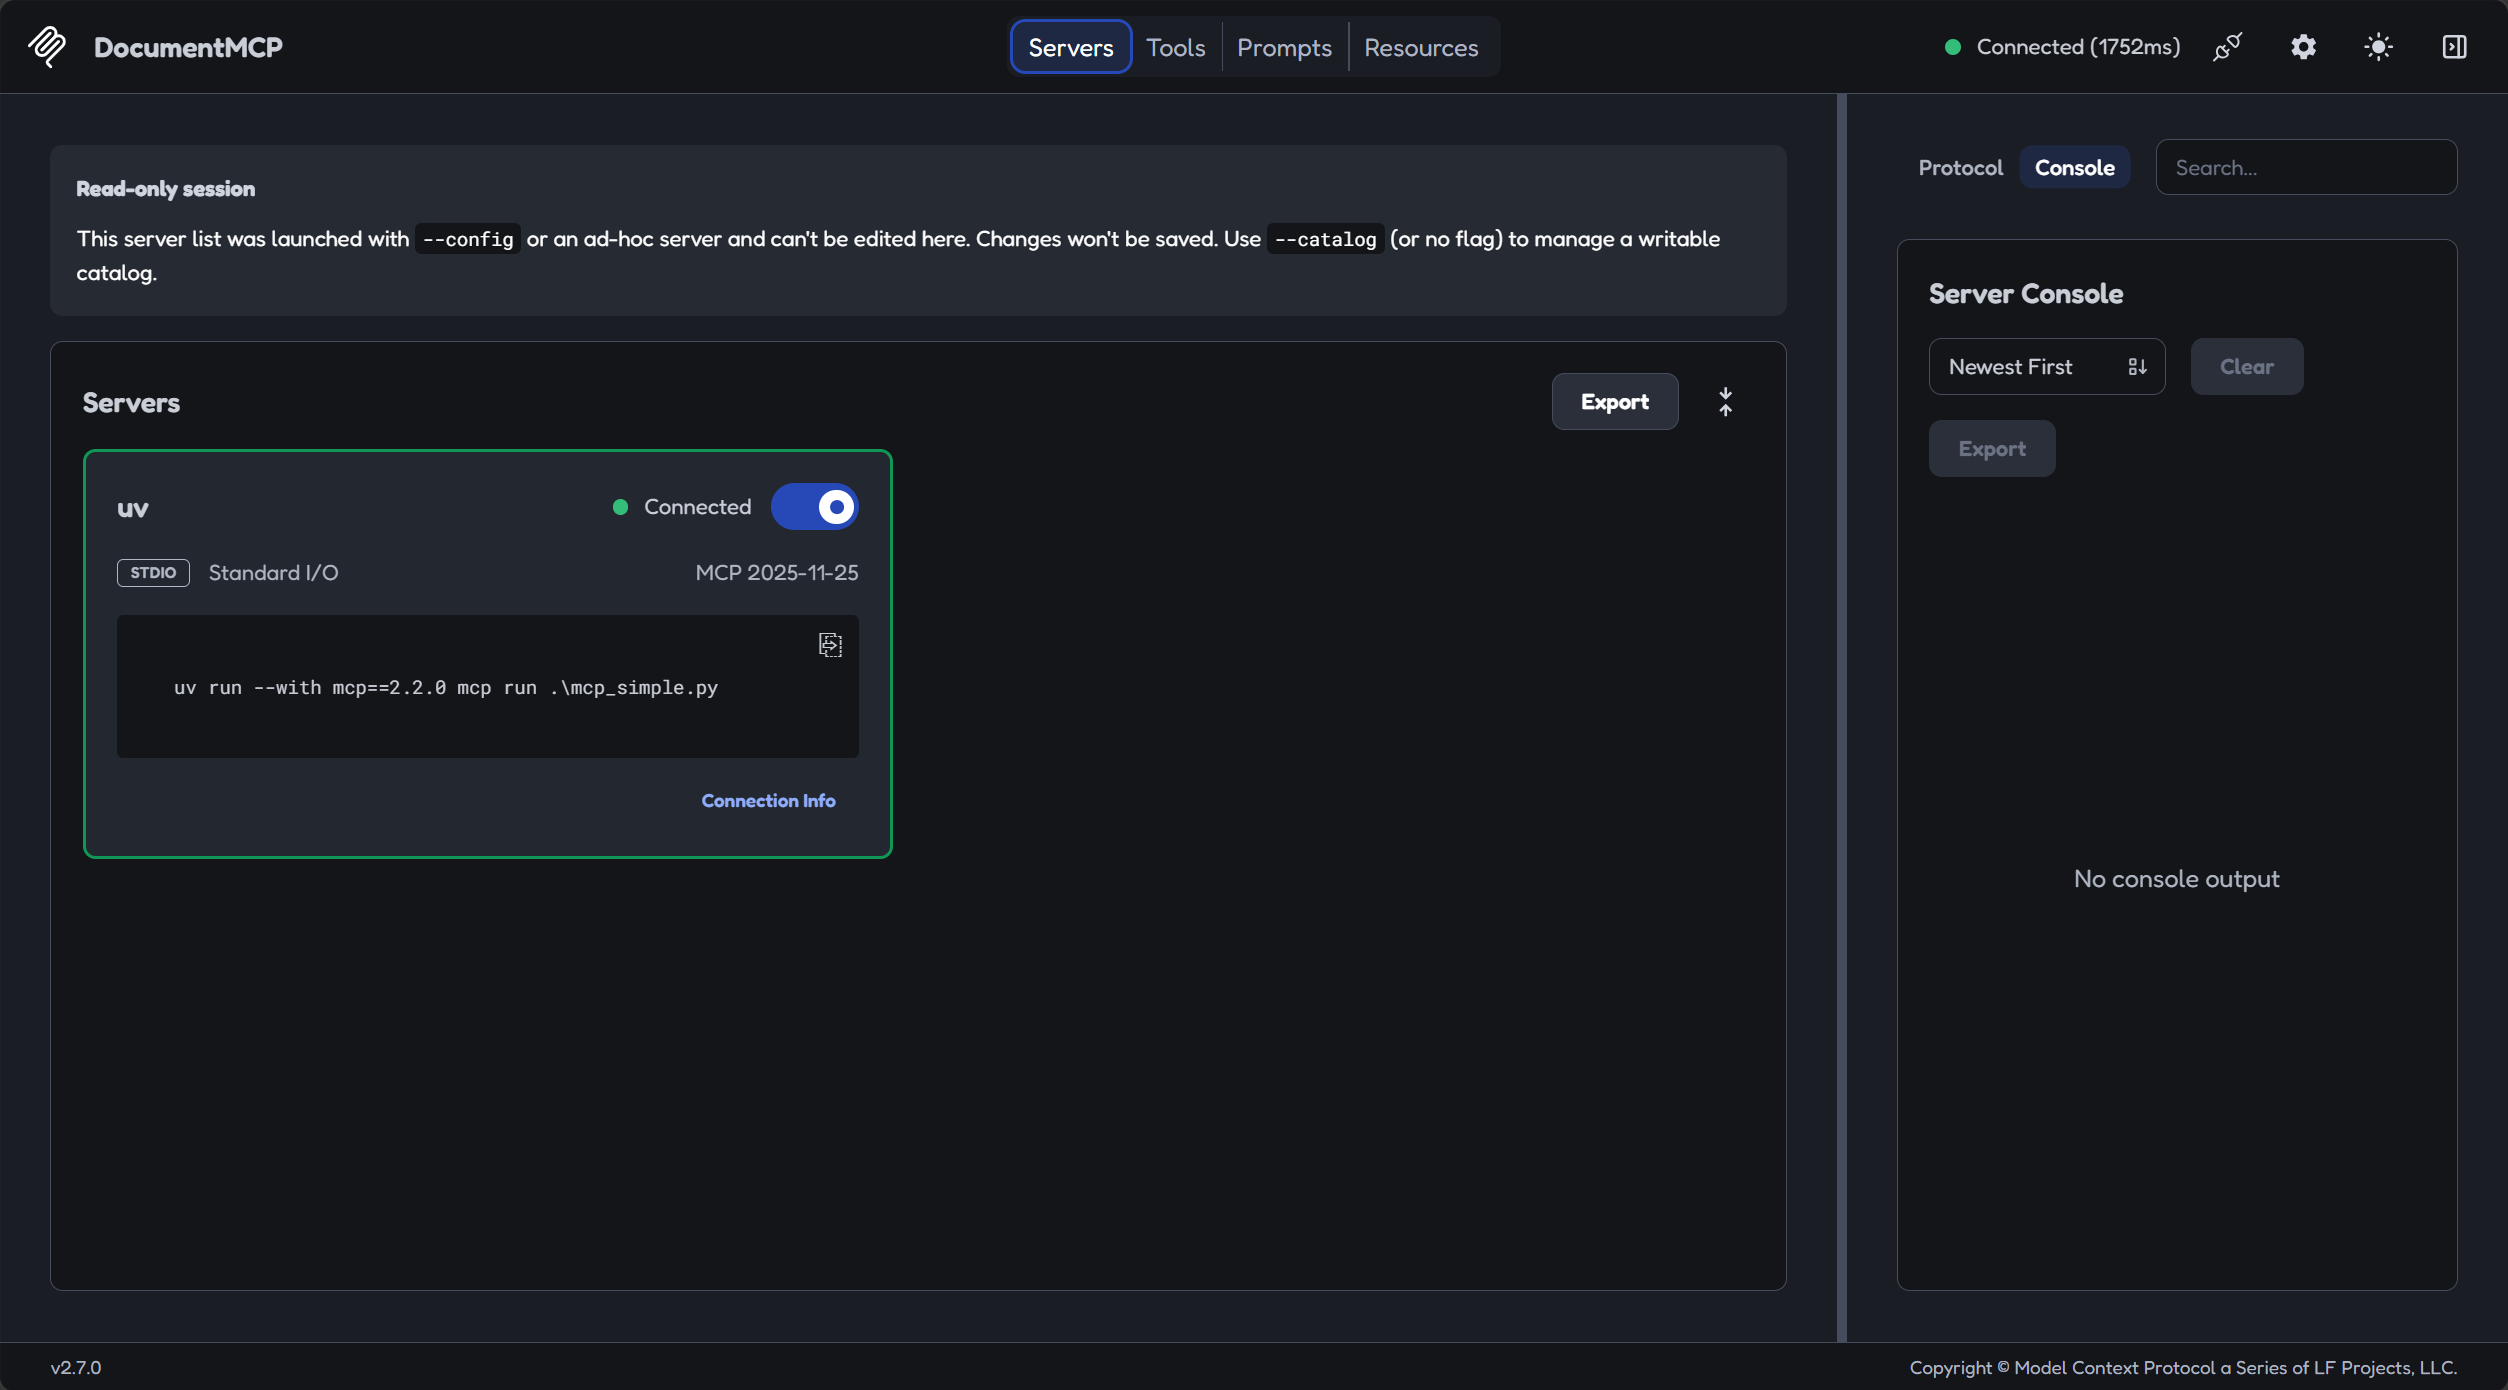
mcp_simple.py 是我一开始起的名字,后面换了,不是出错了。
点击 Tools 标签,进入工具目录
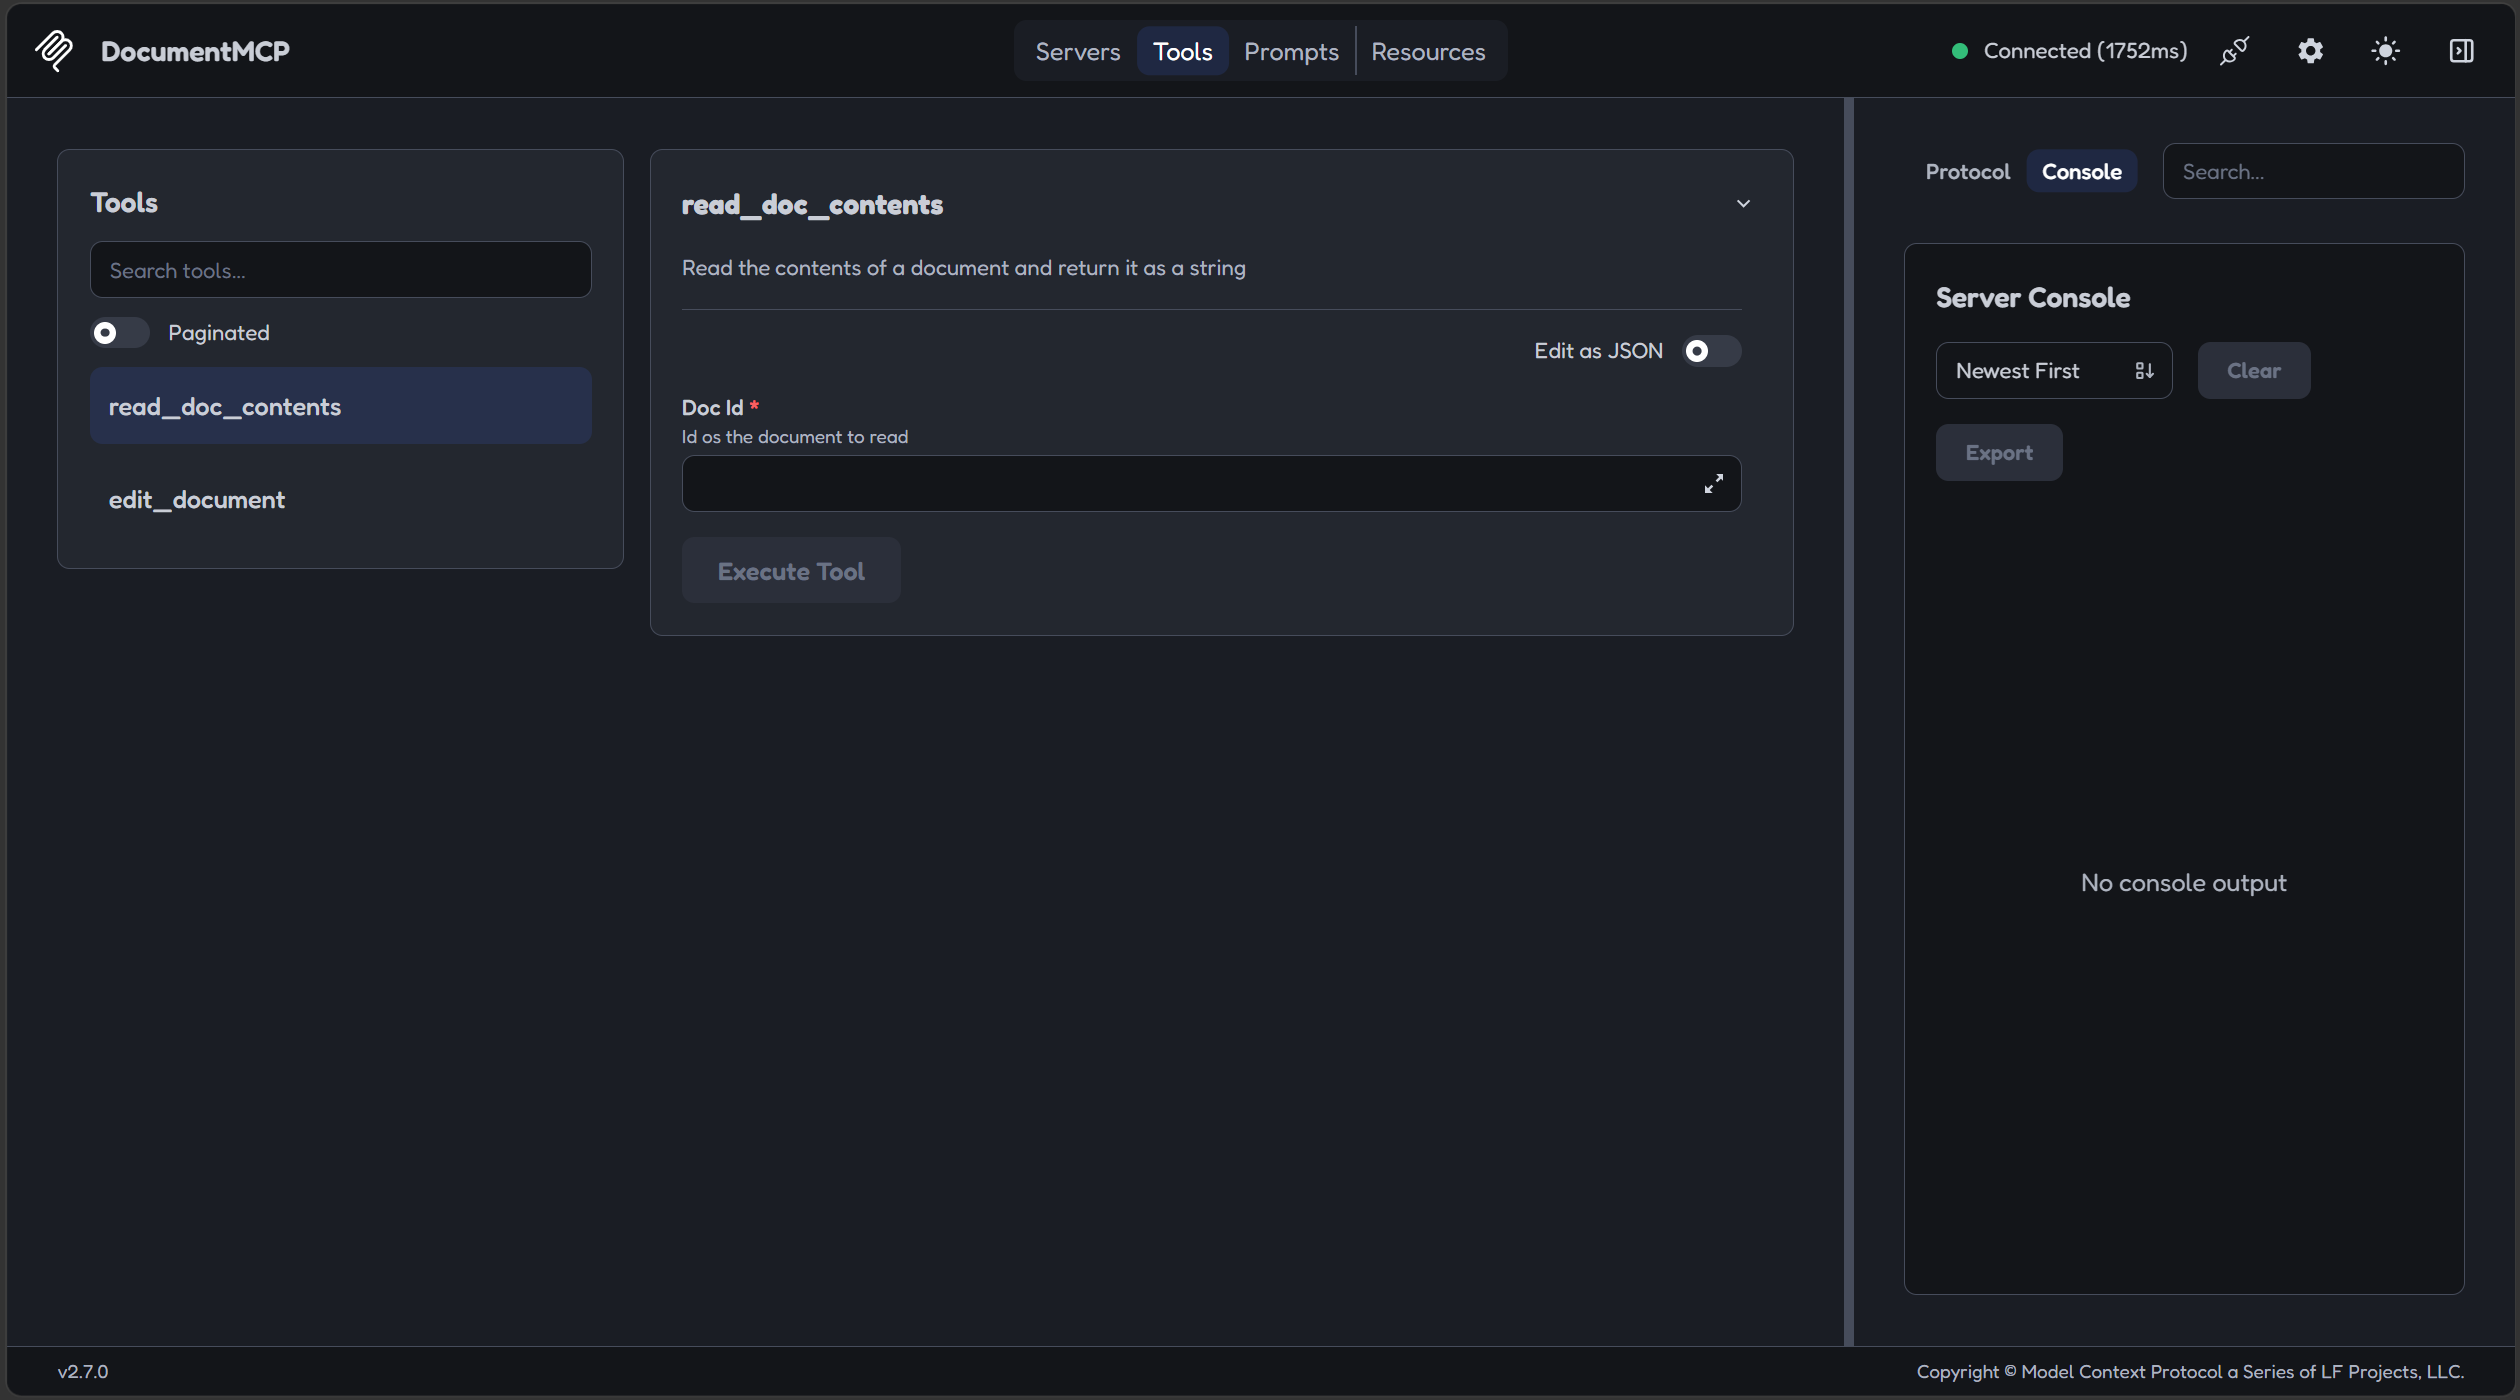
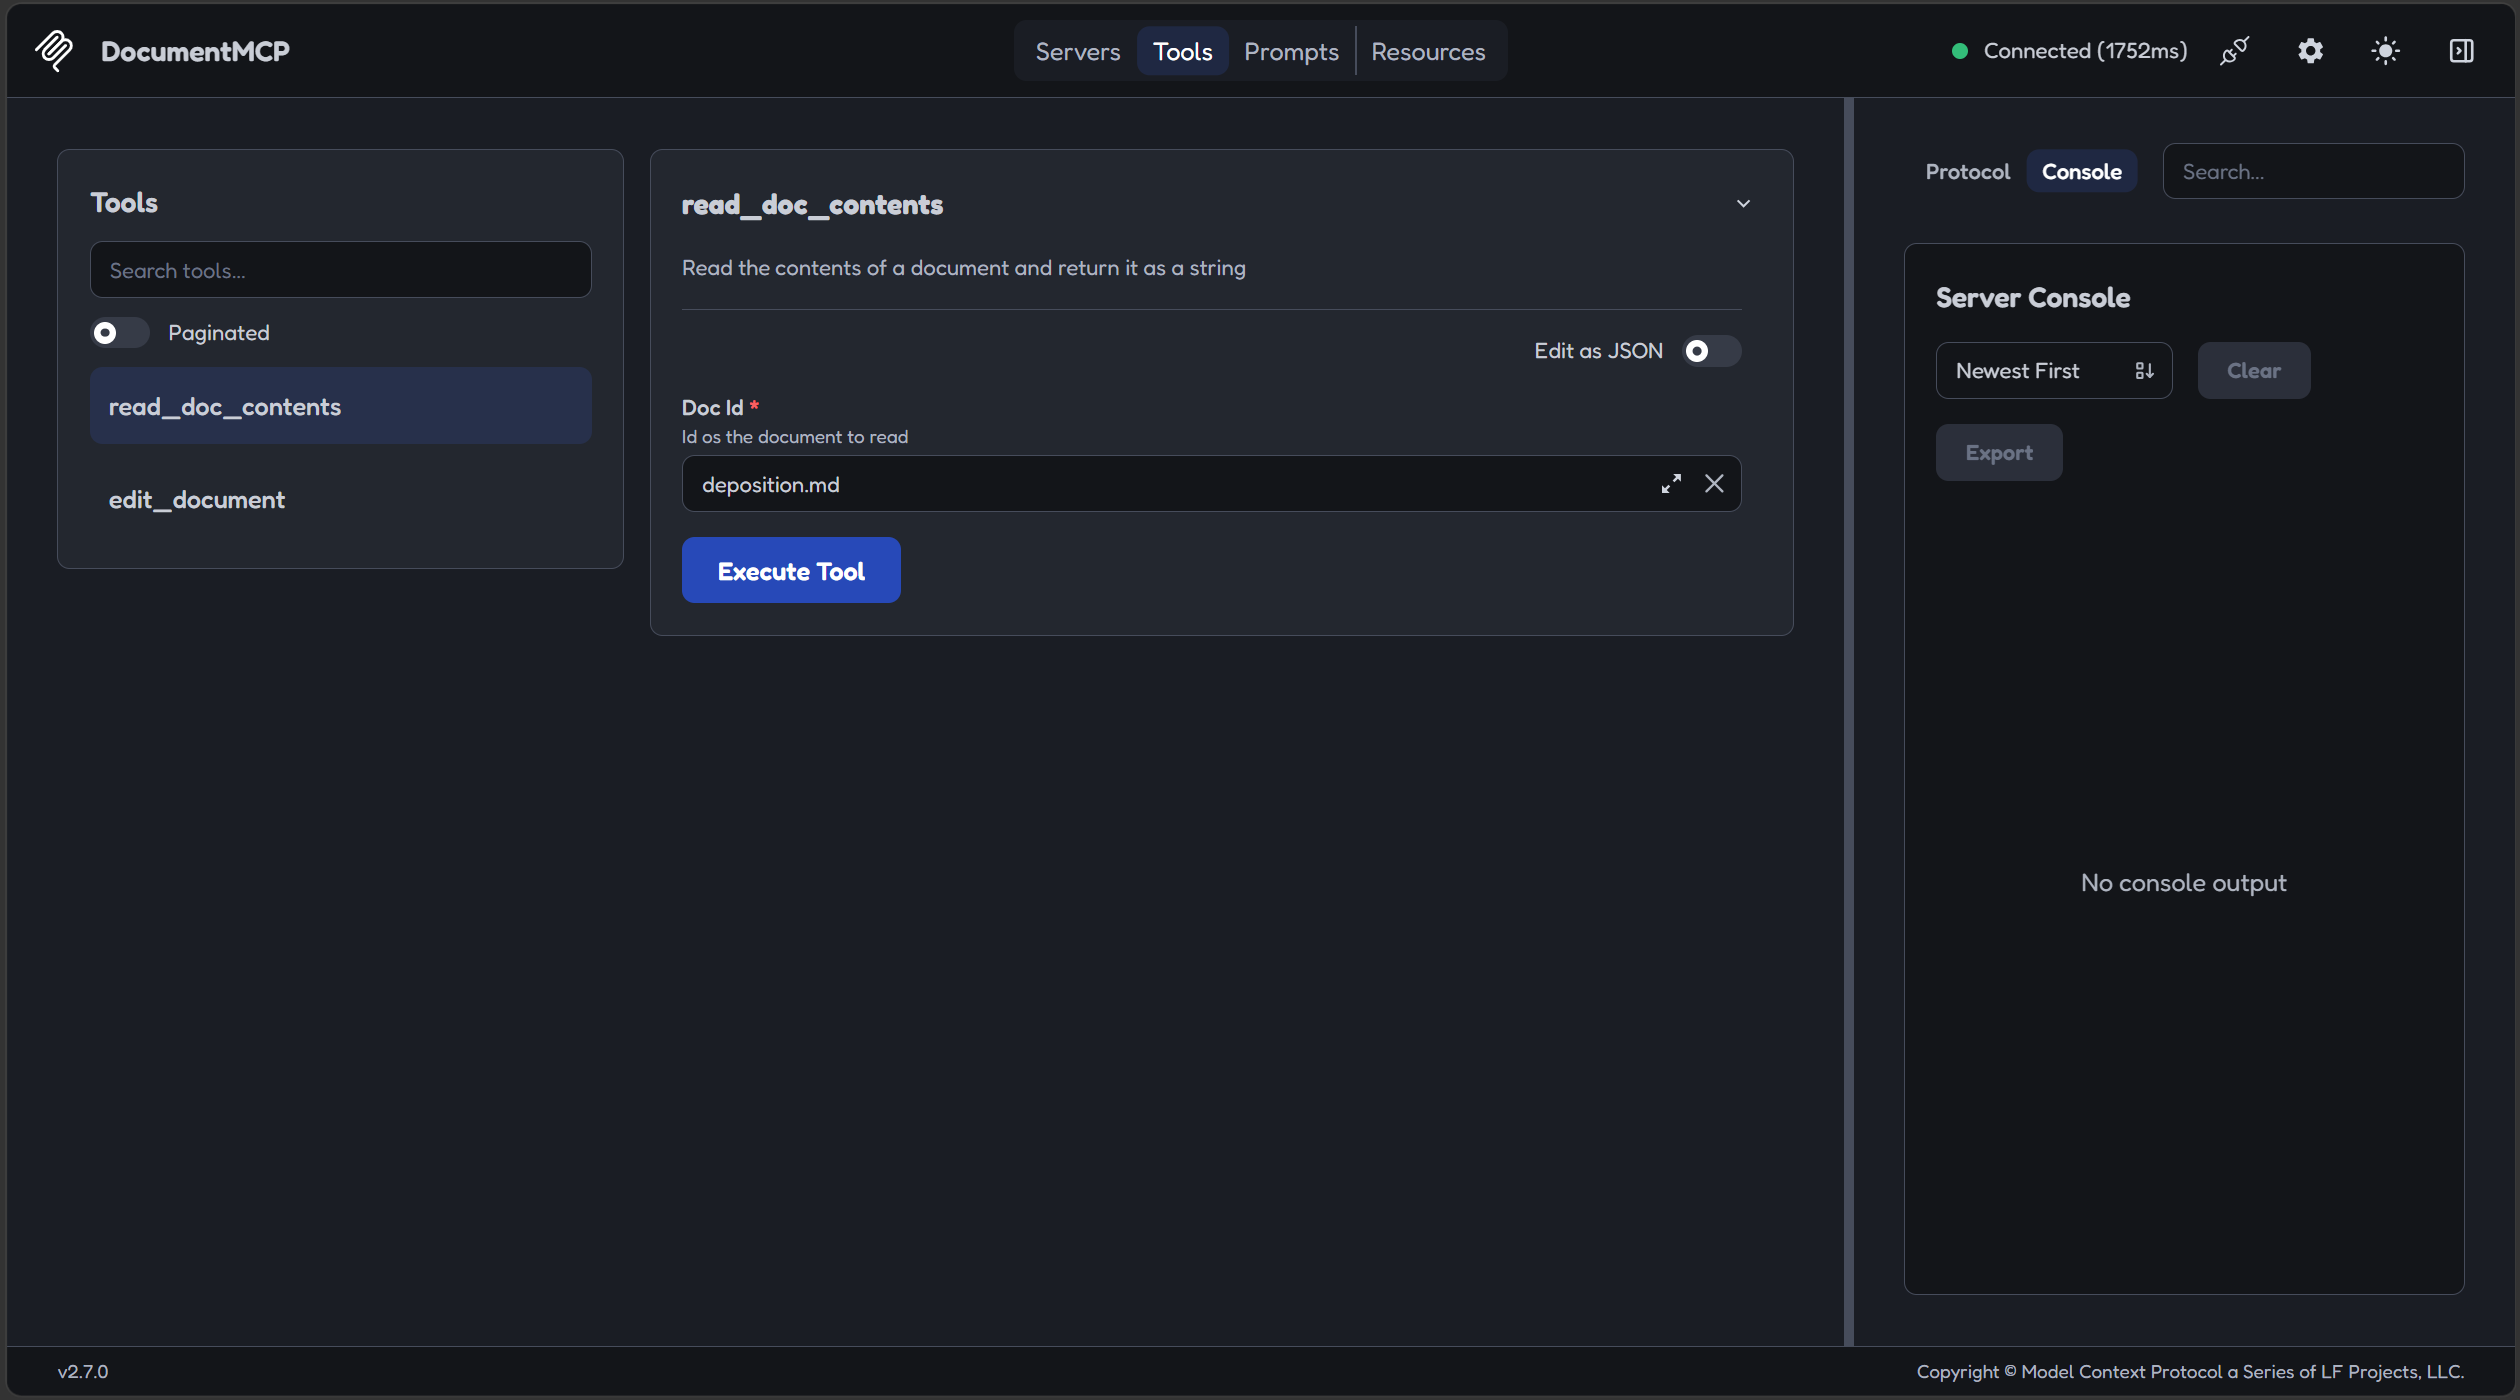
输入一个 doc_id,测试一下工具
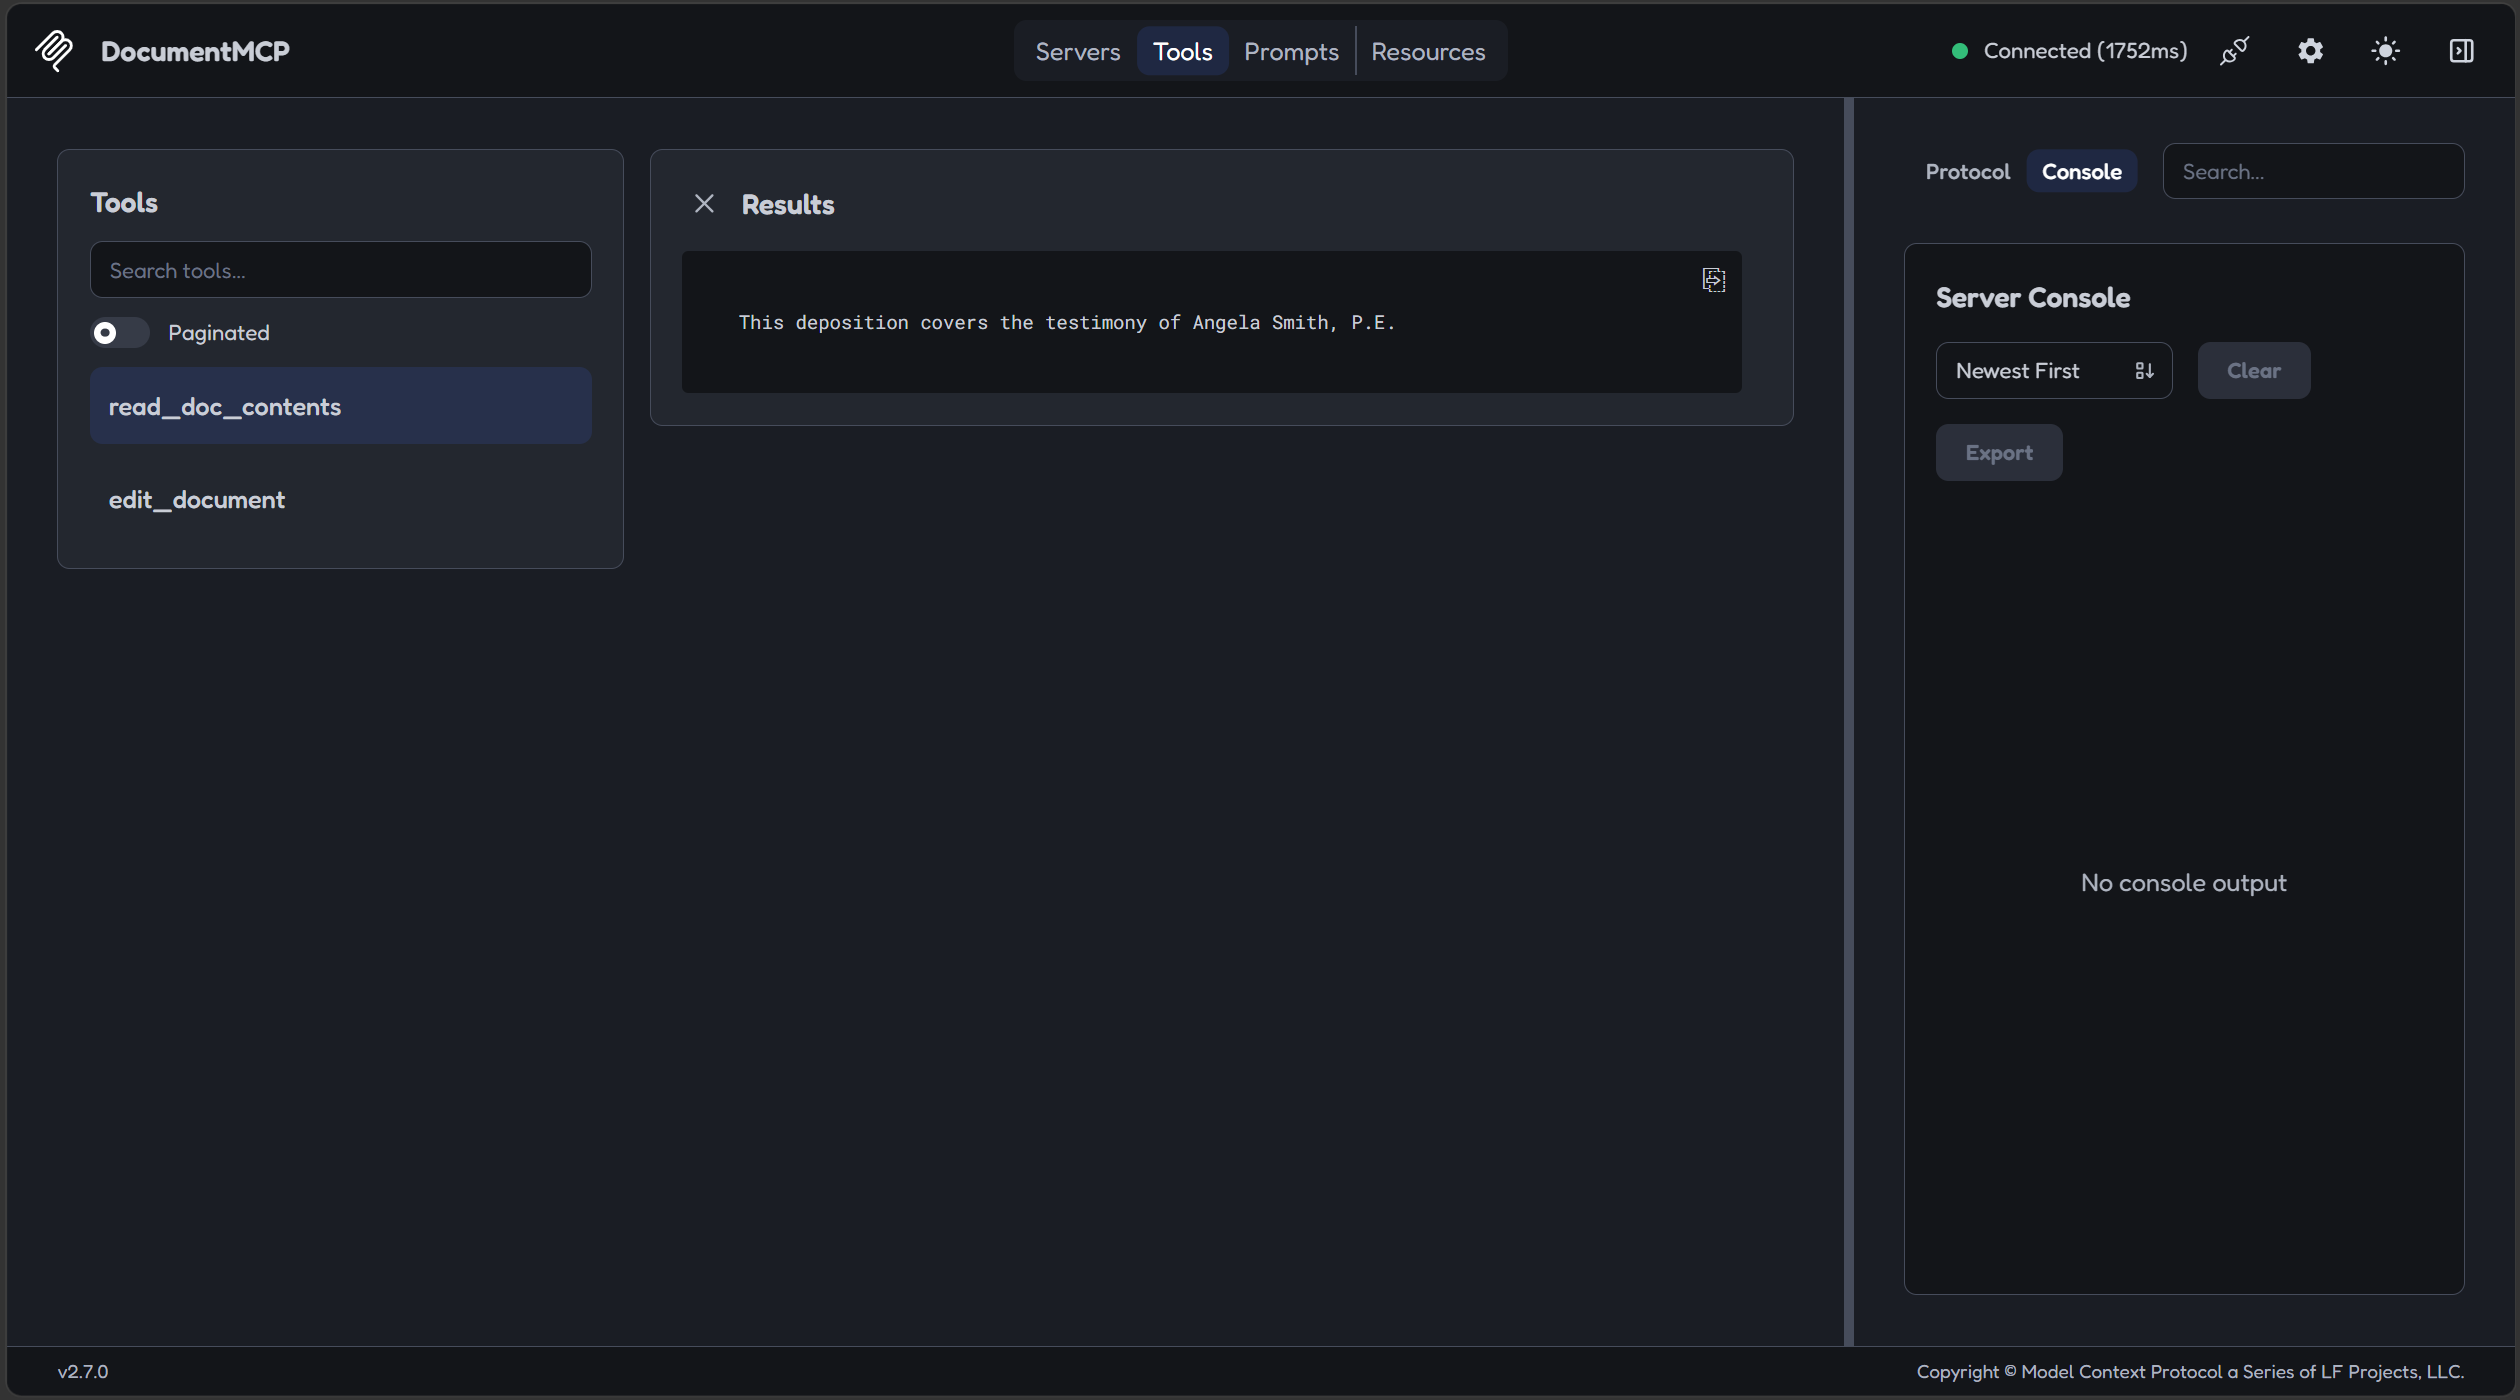
出现内容就说明 MCP 服务器以及工具能够正常使用
定义 MCP 客户端
这部分教程没有详细说,缺少了连接这部分。
先创建一个 mcp_simple_client.py 文件,创建一个 MCPSimpleClient 类:
pythonfrom contextlib import AsyncExitStack

from mcp import ClientSession, types
from mcp.client.streamable_http import streamable_http_client


class MCPSimpleClient:
    def __init__(self) -> None:
        self.session: ClientSession | None = None
        self.exit_stack = AsyncExitStack()

    # 连接服务端
    async def connect(self, url: str):
        # 建立 HTTP 连接,并把断开连接的动作交给 exit_stack 托管
        transport = await self.exit_stack.enter_async_context(
            # http 连接客户端,url 是服务端地址
            streamable_http_client(url)
        )
        # 取出读写通道
        read, write = transport
        # 建立 MCP 会话,交给 exit_stack 管理
        self.session = await self.exit_stack.enter_async_context(
            ClientSession(read, write)
        )
        # 协议握手
        await self.session.initialize()

    # 获取服务端工具列表
    async def list_tools(self) -> list[types.Tool]:
        if self.session is None:
            return []

        result = await self.session.list_tools()
        return result.tools

    # 请求服务端执行工具
    async def call_tool(
        self, tool_name: str, tool_input: dict
    ) -> types.CallToolResult | None:
        if self.session is None:
            return None

        return await self.session.call_tool(tool_name, tool_input)

    # 退出时关闭连接
    async def cleanup(self):
        await self.exit_stack.aclose()
list_tools、call_tool 方法不难理解,均是教程里的方法。connect方法对我来说有点超纲了。
是这样的,如果 MCP 客户端要与 MCP 服务端建立 HTTP 连接,就要使用 streamable_http_client 这个方法,传入服务端的 url 地址。
streamable_http_client这个方法是怎么建立连接的?最基本的,就是使用这样方式:
pythonasync with streamable_http_client(url) as transport:
	read, write = transport
就跟打开文件一样,使用 with 上下文管理器语法,就能够建立连接。但这种方法有个弊端,就是连接只能在上下文(缩进)中,出了上下文连接就断开了。例如我在 connect 方法建立连接,但是 connect 方法执行完了,连接就关闭了,我在 list_tools、call_tool 就拿不到 session。
于是就使用 AsyncExitStack 这个类,注释是:Async context manager for dynamic management of a stack of exit callbacks. 一个用于动态管理退出回调栈的异步上下文管理器,你可以使用它进入多个上下文,并且允许你在其他地方调用这个上下文管理器,获取其中的上下文,控制上下文的退出。可以完美解决上面的问题。
现在就可以解释 connect 方法逻辑了:
pythonasync def connect(self, url: str):
	# 创建一个 streamable_http_client(url) 上下文,建立 HTTP 连接
	transport = await self.exit_stack.enter_async_context(
		streamable_http_client(url)
	)
	# 取出读写通道
	read, write = transport
	# 创建 ClientSession 上下文,建立 MCP 会话
	self.session = await self.exit_stack.enter_async_context(
		ClientSession(read, write)
	)
	# 协议握手
	await self.session.initialize()
等价于下面的写法:
pythonasync def connect(self, url: str):
	 # 创建一个 streamable_http_client(url) 上下文,建立 HTTP 连接
    async with streamable_http_client(url) as transport
        # 取出读写通道
        read, write = transport
        # 创建 ClientSession 上下文,建立 MCP 会话
        async with ClientSession(read, write) as session:
            self.session = session
            await self.session.initialize()
            # 出了上下文会话和连接就会断开
好了,现在可以测试了,我们编写一个主程序 mcp_simple_main.py:
pythonimport asyncio

from mcp_simple_client import MCPSimpleClient


async def main():
    client = MCPSimpleClient()
    try:
        await client.connect("http://127.0.0.1:8000/mcp")
        print("连接成功!")

        tools = await client.list_tools()
        print("可用工具:")
        for tool in tools:
            print(f"  - {tool.name}: {tool.description}")

        # 测试调用 read_doc_contents
        result = await client.call_tool("read_doc_contents", {"doc_id": "report.pdf"})
        print("\n调用结果:")
        print(result)

    finally:
        await client.cleanup()


if __name__ == "__main__":
    asyncio.run(main())
先启动 MCP 服务端:
shellmcp run .\mcp_simple_server.py --transport streamable-http
它不会有任何输出
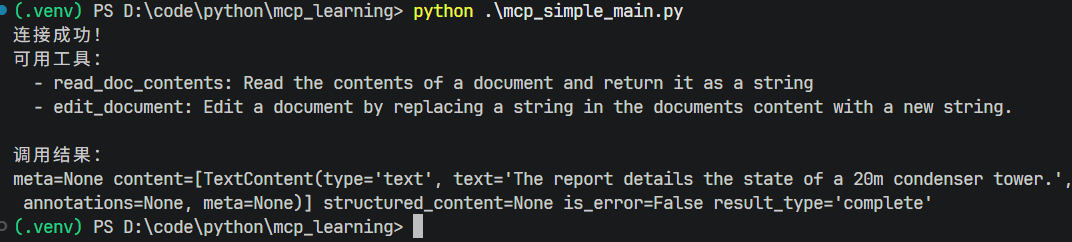
运行主程序:
shellpython .\mcp_simple_main.py
运行结果:
定义与访问资源
Resources(资源)允许 MCP 服务器向客户端公开数据,类似于 HTTP 服务器中的 Get 请求获取资源,适用于只需要获取资源而不需要执行操作的场景,例如代码补全。
教程举了引用文件的例子来说明,当用户输入 @document_name 引用文件时,需要两个操作:
- 获取所有可用的文档列表(用于自动补全)
- 获取引用的特定文档的内容(当被提及时)
当用户引用了这个文档,就需要自动将该文档注入并发送给 Claude,不需要 Claude 执行工具来获取数据。
其原理是客户端发送一个带有 URI 的 ReadResourceRequest 来请求它想要的资源,MCP 服务器会处理此请求并在 ReadResourceResult 中返回数据。
资源有两个类型:直接资源、模板化资源。直接资源有固定、静态的 URI,适合不用参数的操作;模板化资源会在 URI 中包含参数,需要将其作为关键字传递给获取资源的函数中。
在 mcp_simple_server.py 中,追加下面的代码:
python# 定义一个直接资源:文件列表
@mcp.resource("docs://documents", mime_type="application/json")
def list_docs() -> list[str]:
    return list(docs.keys())

# 定义一个模板化资源:文件内容
@mcp.resource("docs://documents/{doc_id}", mime_type="text/plain")
def fetch_doc(doc_id: str) -> str:
    if doc_id not in docs:
        raise ValueError(f"Doc with id {doc_id} not found")

    return docs[doc_id]
资源可以返回任何类型的数据——字符串、JSON、二进制数据等。需要使用 mime_type 参数向客户端提示服务端返回的数据类型:
"application/json"用于结构化数据"text/plain"用于纯文本"application/pdf"用于二进制文件
启动服务端,我这里不知道为什么,使用 mcp dev 命令启动,界面回退到 v1 版了,我使用另一个命令指定版本:
shellnpx @modelcontextprotocol/inspector@latest uv run --with mcp==2.2.0 mcp run .\mcp_simple_server.py
node 版本要大于 22.19.0
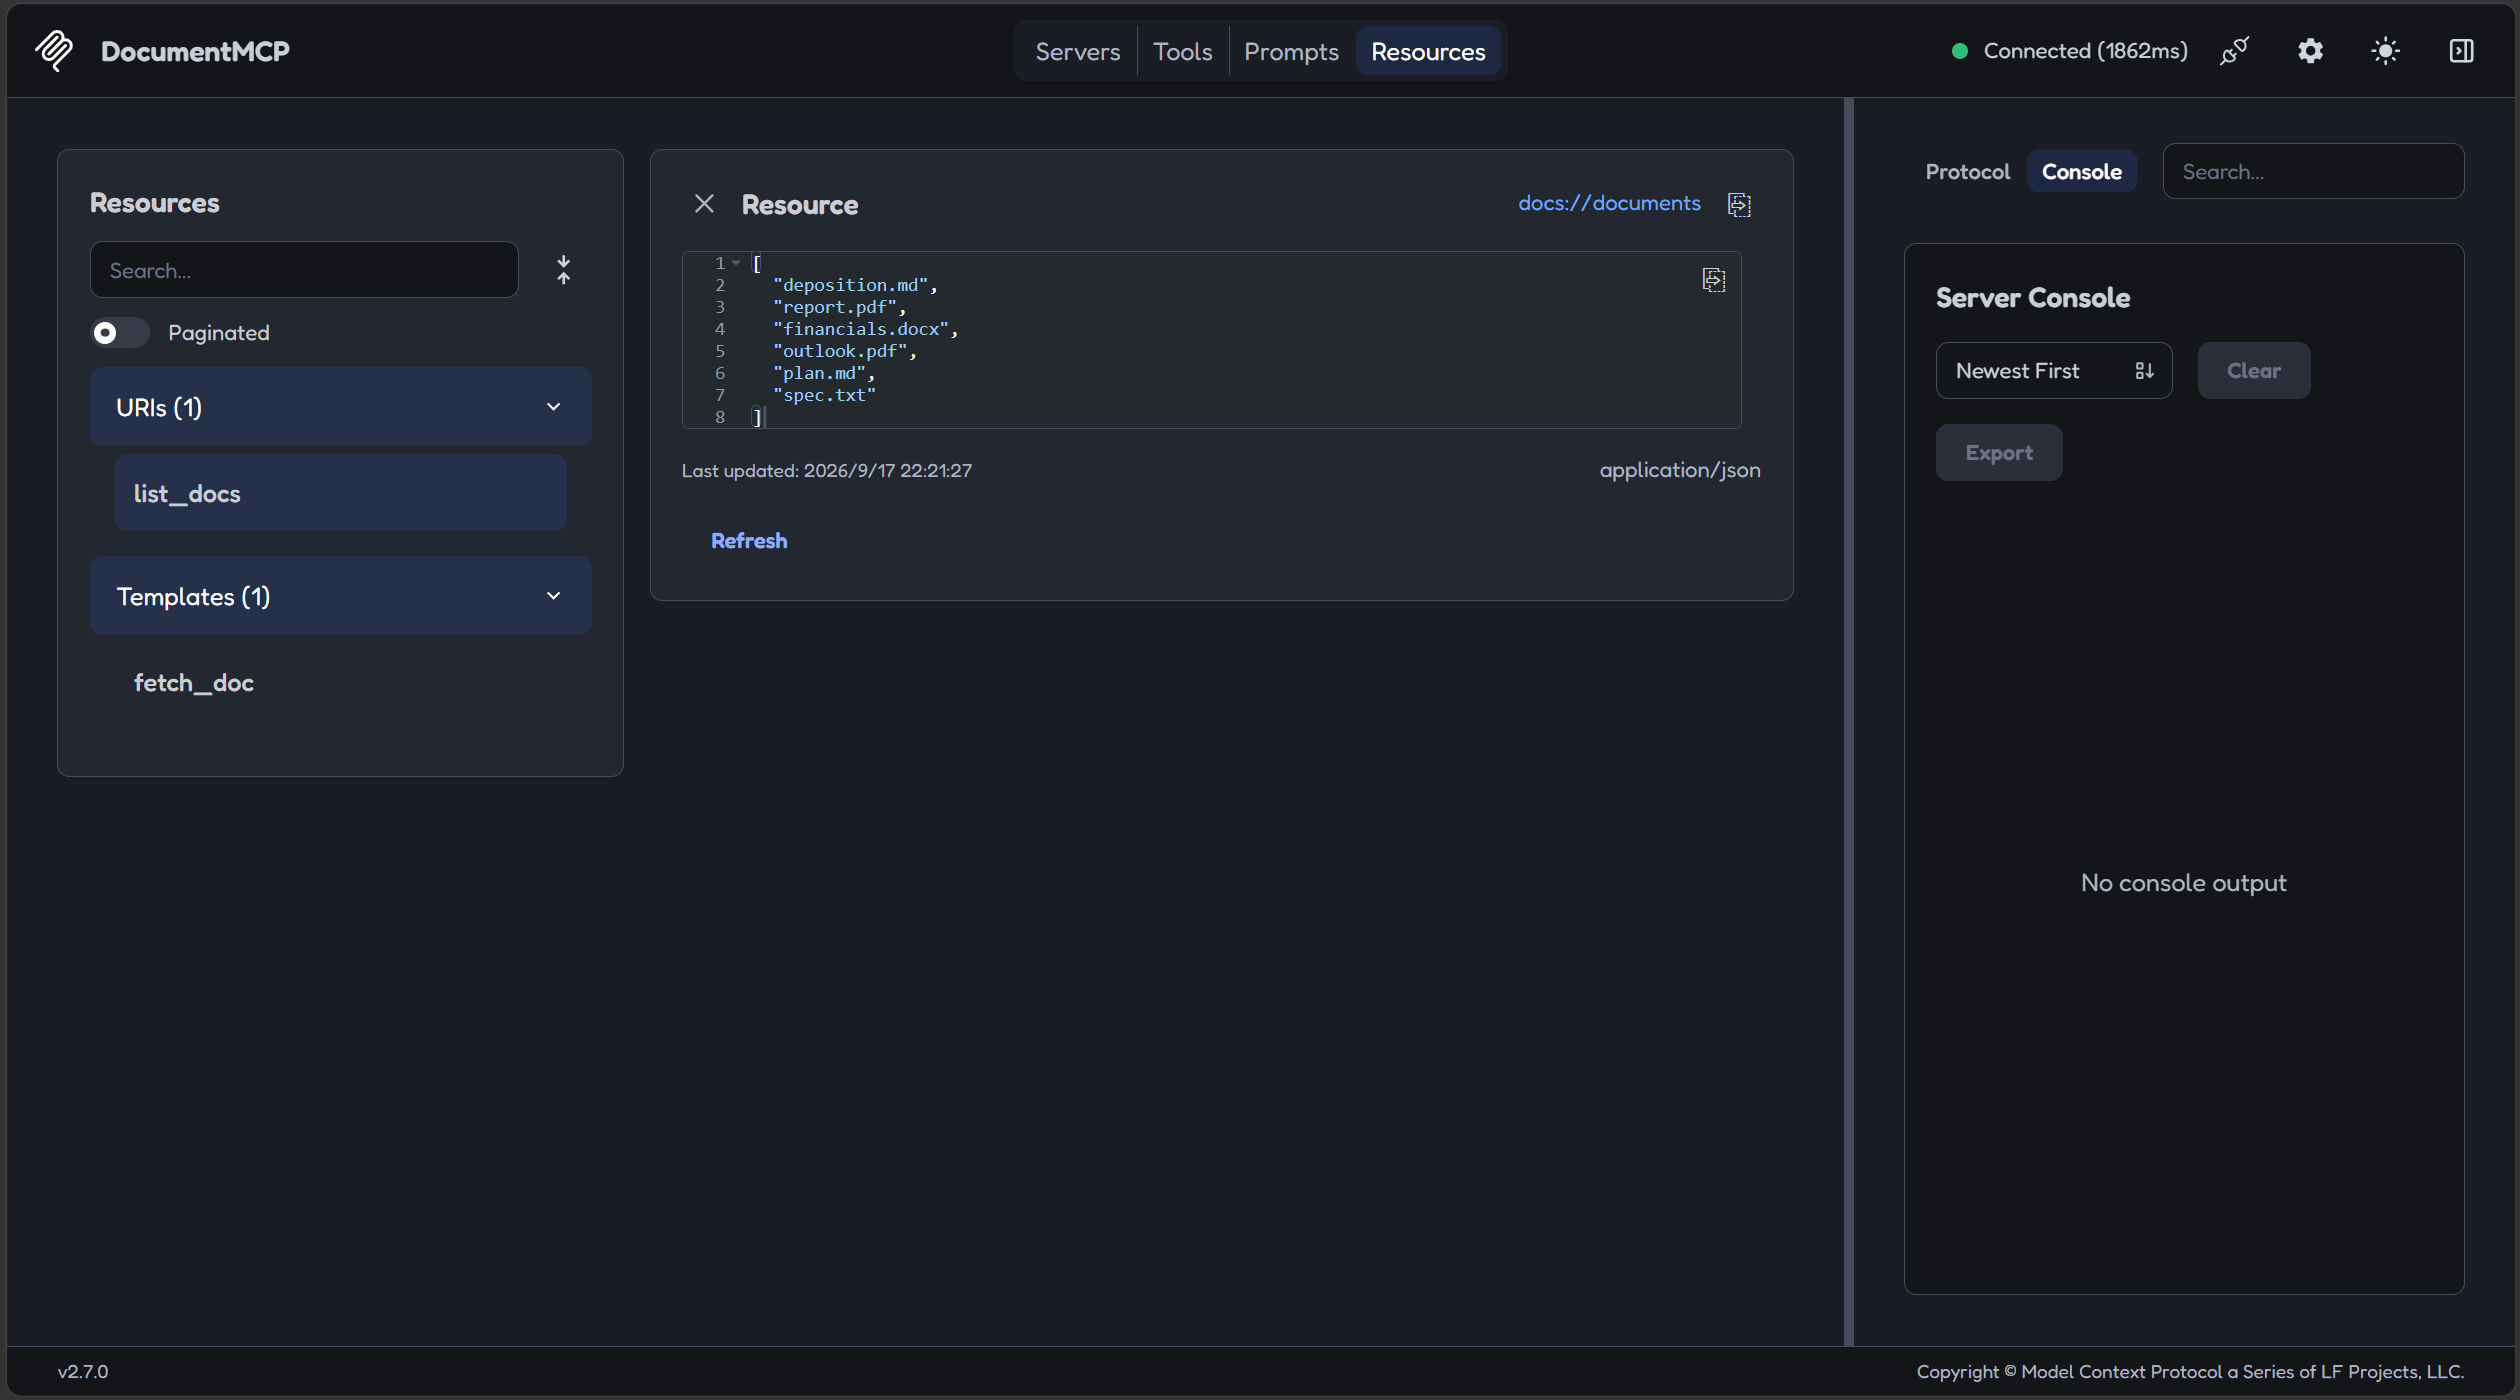
启动后,点击 connect 按钮启动服务器,然后点击顶部的 Resources 标签,就可以看到创建的两个资源了,可以调用一下。
接下来是客户端如何访问资源,方法很简单,就是追加一个方法:
pythonimport json
from typing import Any

# 读取资源
async def read_resource(self, uri: str) -> Any:
	if self.session is None:
		return None
	result = await self.session.read_resource(uri)
	resource = result.contents[0]

	if isinstance(resource, types.TextResourceContents):
		if resource.mime_type == "application/json":
			return json.loads(resource.text)
		elif resource.mime_type == "text/plain":
			return resource.text
	return None
接下来测试一下,先改造一下 mcp_simple_main.py:
pythonimport asyncio

from mcp_simple_client import MCPSimpleClient


async def main():
    client = MCPSimpleClient()
    try:
        await client.connect("http://127.0.0.1:8000/mcp")
        print("连接成功!")

        resource = await client.read_resource("docs://documents")
        print("访问直接资源:")
        print(f"{resource}")

        t_resource = await client.read_resource("docs://documents/deposition.md")
        print("访问模板化资源 deposition.md :")
        print(f"{t_resource}")

    finally:
        await client.cleanup()


if __name__ == "__main__":
    asyncio.run(main())
读取资源需要客户端通过 mime_type 判断类型来对文件内容进行解析。
启动服务端,运行客户端,结果

这种资源访问方式的好处就是:不需要额外工具调用。
定义和获取提示词
这里的提示词,其实就是一套定义在 MCP 服务器的提示词模版,客户端可以调用特定的提示词获取接口,获取对应的提示词模版,将其插入到 LLM 的会话中。
定义提示词的方法很简单,在 mcp_simple_server.py 里,新增一个方法:
python# 定义一个提示词
@mcp.prompt(
    name="format",
    description="Rewrites the contents of the document in Markdown format."
)
def format_document(
    doc_id: str = Field(description="Id of the document to format")
) -> list[base.Message]:
    prompt = f"""
Your goal is to reformat a document to be written with markdown syntax.

The id of the document you need to reformat is:
<document_id>
{doc_id}
</document_id>

Add in headers, bullet points, tables, etc as necessary. Feel free to add in structure.
Use the 'edit_document' tool to edit the document. After the document has been reformatted...
"""
    return [
        base.UserMessage(prompt)
    ]
就是定义提示词特定的 name,类似 id,定义需要传入的关键词参数,将关键词参数插入到模版中,将其以 User 消息的方式返回给客户端。
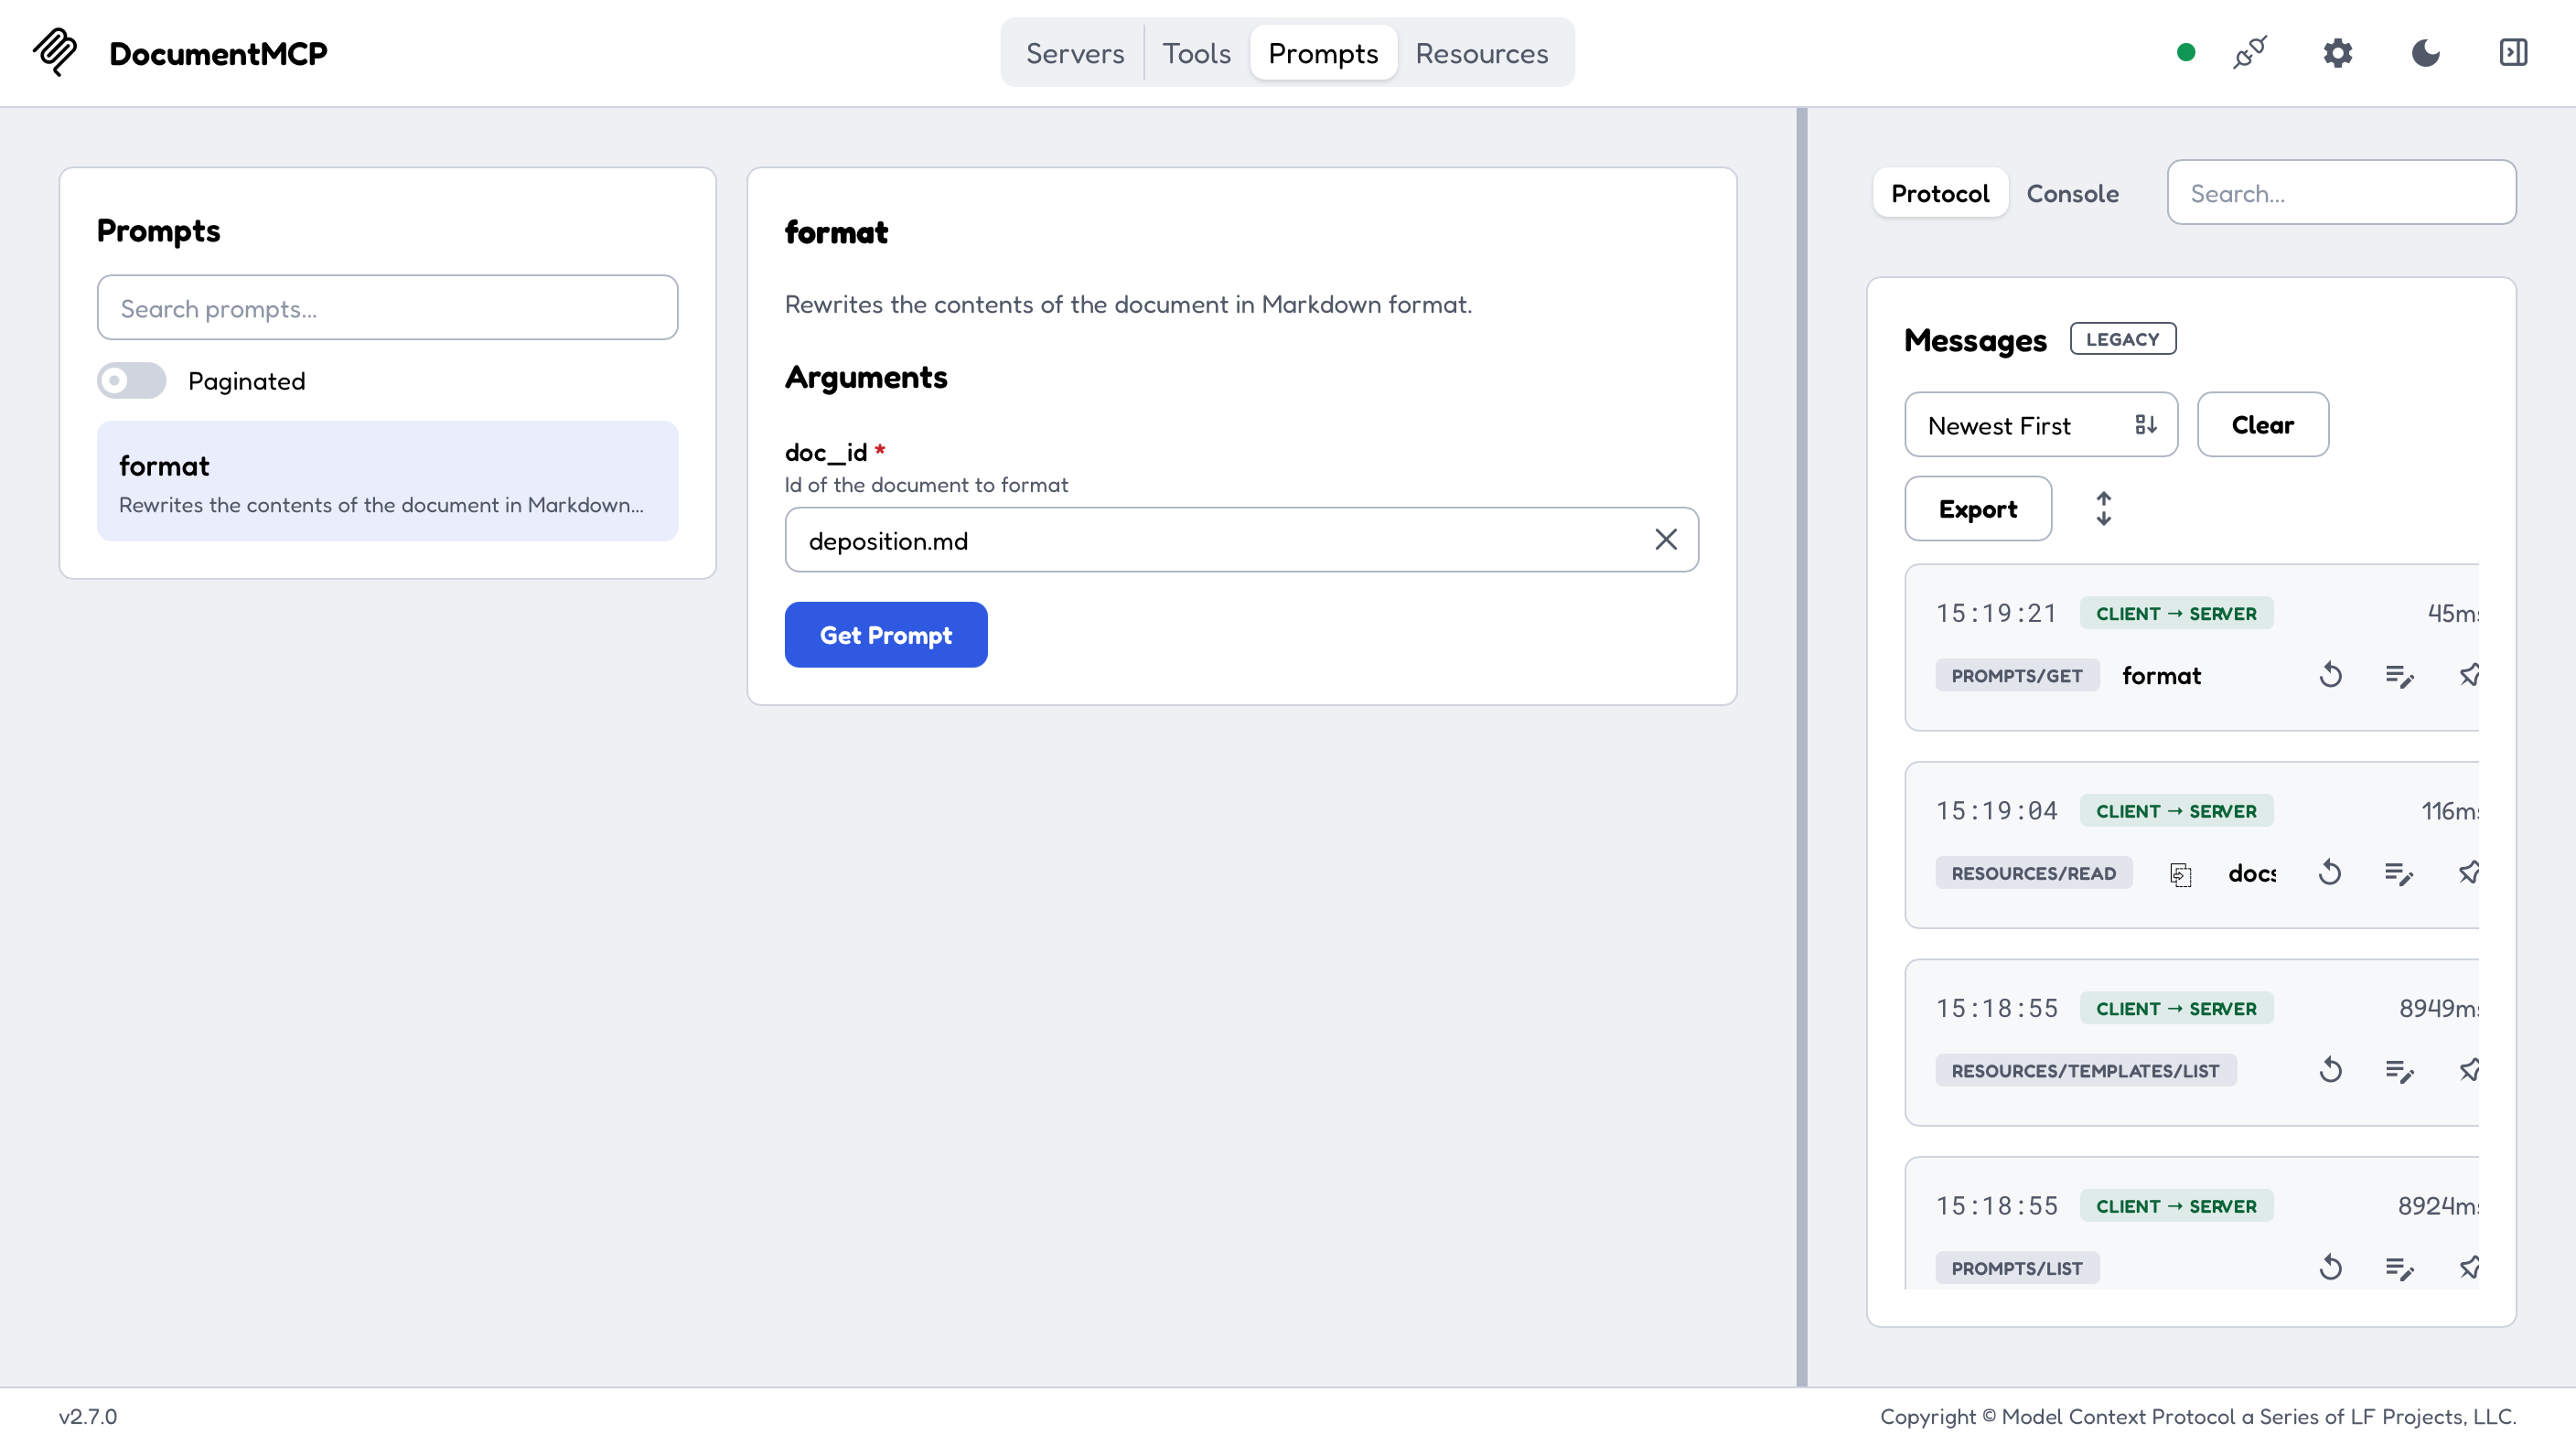
服务端编写好以后,可以进入 inspector 查看,点击 connect 开启 MCP 服务端后,点击顶部的 Prompt 标签:
对于客户端,我们需要定义两个方法,一个是获取 MCP 服务器可以提供哪些提示词,另一个就是调用获取提示词的方法,基本和 Tools 一样的操作。编写 mcp_simple_client.py,新增两个方法:
python# 列出提示 async def list_prompts(self) -> list[types.Prompt]: if self.session is None: return None result = await self.session.list_prompts() return result.prompts # 获取单个提示 async def get_prompt(self, prompt_name, args: dict[str, str]): if self.session is None: return None result = await self.session.get_prompt(prompt_name, args) return result.messages
修改一下 mcp_simple_main.py:
pythonimport asyncio

from mcp_simple_client import MCPSimpleClient


async def main():
    client = MCPSimpleClient()
    try:
        await client.connect("http://127.0.0.1:8000/mcp")
        print("连接成功!")

        prompts = await client.list_prompts()
        print("获取提示词列表:")
        print(f"{prompts}")

        prompt_detail = await client.get_prompt("format", {"doc_id": "deposition.md"})
        print("获取提示词 deposition.md :")
        print(f"{prompt_detail}")

    finally:
        await client.cleanup()


if __name__ == "__main__":
    asyncio.run(main())
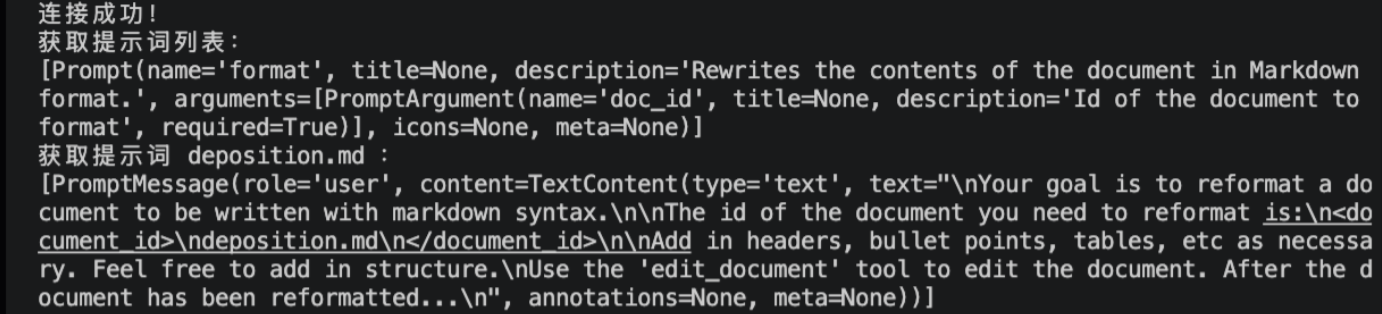
启动 MCP 服务端,运行 main 程序,结果如下
我个时候把项目用 uv 管理了,所以换了一个启动命令。
自此,MCP 介绍这个课程就结束了。
总结
MCP 名为模型上下文协议,目的是为 LLM 提供调用外部服务的规范,让 LLM 可以通过标准、统一的方式调用外部服务。
在本课程中,我们学习了如何使用 Python 定义如下内容:
- MCP 服务端
- MCP 服务端工具
- MCP 客户端
- MCP 资源
- MCP 提示词 还学习了如何调试和启动服务端、客户端如何调用和访问服务端的 MCP 内容。
附带一个 Claude 学院的勋章
MCP 高级主题
Sampling
Sampling (采样),允许 MCP 服务端通过已经连接的 MCP 客户端访问 LLM 。服务端不直接调用,而且请求客户端代表服务端进行调用,将调用 LLM 生成文本的责任和成本从服务端转移到客户端。
这个功能适用于 MCP 服务端需要调用 LLM 的情况。课程中举了一个例子,假设有个研究工具 MCP,它需要使用网络检索功能检索数据,然后通过 LLM 将检索内容总结,继续进行下一步的研究。此时就需要 MCP 服务端调用 LLM 了。
但是如果 MCP 服务端直接调用 LLM,那么 MCP 服务器就要维护 API Key、LLM Url、LLM 调用等等,极大增加了复杂度。
Sampling 就是为了解决这个问题,它允许 MCP 服务端向客户端发送一个简要的提示词,让客户端代表服务端调用 LLM,并将 LLM 的调用结果返回给服务端。
课程中给的代码要实际调用 Claude 模型,为了实现这个代码,我使用 Deepseek + LangChain 来做。需要注意的是,课程中的服务端使用的,发送 Sampling 请求的逻辑,其 ctx.session.create_message 方法在今年七月份弃用了,并且整个发送 Sampling 请求的逻辑都改变了,我这里用最新的方法实现。
创建一个 mcp_advance_server.py 文件:
pythonfrom typing import Annotated
from mcp.server.mcpserver import MCPServer, Context, Sample, Resolve
from mcp.types import SamplingMessage, TextContent, CreateMessageResult


mcp = MCPServer(name="advance_server", log_level="ERROR")

# Sampling 请求方法
def summarize_resolver(docs: list[str]) -> Sample:
    # 构建提示词
    prompt = f"""
Please summarize the following text:
{docs}
"""
    # 返回一个 Sampling 请求声明
    return Sample(
        # 插入提示词
        messages=[
            SamplingMessage(
                role="user",
                content=TextContent(type="text", text=prompt)
            )
        ],
        max_tokens=4096,
        system_prompt="You are a helpful research assistant."
    )

# 定义 MCP 工具
@mcp.tool(
    name="summarize",
    description="Read the content of documents and summarize it"
)
def summarize(
    docs: list[str],
    # Sampling 参数注入
    summary: Annotated[CreateMessageResult, Resolve(summarize_resolver)]
):
    if summary.content.type == "text":
        return summary.content.text
    else:
        raise ValueError("Sampling failed")
Sampling 参数注入那一行,如果写过 FastAPI 应该很熟悉这种写法:def get_user_info(user: Annotated[User, Depends(get_current_user)]):。其实就是依赖注入,它告诉函数,我要创建一个 CreateMessageResult ,请用 summarize_resolver 解析它。
新版这种声明式的写法,就不需要自己发送 Sampling 请求,而是交给框架处理。
接下来,我们要写一个简单的 deepseek 调用方法,创建一个 deepseek_client.py,编写内容:
pythonfrom dotenv import load_dotenv from langchain_deepseek import ChatDeepSeek load_dotenv() llm = ChatDeepSeek( model="deepseek-flash", temperature=0.7, max_retries=2, timeout=30, ) async def deepseek_invoke(messages: list[dict[str, str]]): response = llm.invoke(messages) return response
记得在根目录新增 .env 文件,添加
DEEPSEEK_API_KEY。
接下来编写客户端,创建 mcp_advance_client.py:
pythonfrom contextlib import AsyncExitStack

from mcp import ClientSession, types
from mcp.client.streamable_http import streamable_http_client
from mcp.client.session import ClientRequestContext
from deepseek_client import deepseek_invoke

class MCPAdvanceClient:
    def __init__(self) -> None:
        self.session: ClientSession | None = None
        self.exit_stack = AsyncExitStack()

    # Sampling 回调处理
    async def sampling_callback(
        self,
        context: ClientRequestContext,
        params: types.CreateMessageRequestParams
    ):
        # 消息列表
        messages = []
        # 解析 Sampling 消息
        for msg in params.messages:
            # 根据不同的角色分别解析
            if msg.role == "user" and msg.content.type == "text":
                content = (
                    msg.content.text
                    if hasattr(msg.content, "text")
                    else str(msg.content)
                )
                messages.append({
                    "role": "user",
                    "content": content
                })
            elif msg.role == "assistant" and msg.content.type == "text":
                content = (
                    msg.content.text
                    if hasattr(msg.content, "text")
                    else str(msg.content)
                )
                messages.append({
                    "role": "assistant",
                    "content": content
                })
        # 调用 deepseek 接口
        response = await deepseek_invoke(messages)
        # 将调用结果返回
        return types.CreateMessageResult(
            role="assistant",
            content=types.TextContent(
                type="text",
                text=response.content
            ),
            model="deepseek-flash",
            stop_reason="endTurn"
        )

    # 连接服务端
    async def connect(self, url: str):
        transport = await self.exit_stack.enter_async_context(
            streamable_http_client(url)
        )
        read, write = transport
        # 记得在这里设置 sampling 回调!!!
        self.session = await self.exit_stack.enter_async_context(
            ClientSession(read, write, sampling_callback=self.sampling_callback)
        )
        await self.session.initialize()

    # 获取服务端工具列表
    async def list_tools(self) -> list[types.Tool]:
        if self.session is None:
            return []

        result = await self.session.list_tools()
        return result.tools

    # 请求服务端执行工具
    async def call_tool(
        self, tool_name: str, tool_input: dict
    ) -> types.CallToolResult | None:
        if self.session is None:
            return None

        return await self.session.call_tool(tool_name, tool_input)

    # 退出时关闭连接
    async def cleanup(self):
        await self.exit_stack.aclose()
大部分代码和 simple 版的一致,新增了 Sampling 回调处理逻辑,并且在连接方法中注册了 Sampling 回调处理方法。
接下来编写 mcp_advance_main.py:
pythonimport asyncio

from mcp_advance_client import MCPAdvanceClient

# 自定义文档,模拟网页检索结果
docs = [
    "人工智能自二十世纪五十年代提出以来,经历多次起伏,逐步从理论探索走向实际应用。",
    "深度学习在图像识别、语音处理等领域取得突破,推动人工智能进入快速发展阶段。",
    "大语言模型凭借海量数据和强大算力,能够生成文本、编写代码并辅助复杂决策。",
    "人工智能正融入医疗、教育、金融和制造等行业,提升效率并催生新的商业模式。",
    "未来人工智能需兼顾创新与安全,完善伦理规范和法律监管,才能实现可持续发展。",
]

async def main():
    client = MCPAdvanceClient()
    try:
        await client.connect("http://127.0.0.1:8000/mcp")
        print("连接成功!")

        tools = await client.list_tools()
        print("可用工具:")
        for tool in tools:
            print(f"  - {tool.name}: {tool.description}")

        result = await client.call_tool("summarize", {"docs": docs})
        print("\n调用结果:")
        print(result.content[0].text)

    finally:
        await client.cleanup()


if __name__ == "__main__":
    asyncio.run(main())
启动服务端,执行 main 方法:
shelluv run --with mcp==2.2.0 mcp run advance/mcp_advance_server.py --transport streamable-http

uv run advance/mcp_advance_main.py
执行结果:

日志与进度
顾名思义,日志与进度允许 MCP 服务器向客户端发送工具处理的日志与进度信息,让用户可以知道当前工具正在干什么。
不过在今年(2026-07-28)七月,发送日志的方法被宣布弃用了,没有替代方法,也就是说 MCP 不再支持 MCP 服务端发送日志的功能,但是进度的发送目前可用。
来简单实现一下吧,先编写服务端,我们新增一个工具,模拟网页搜索功能:
python# 定义网页搜索 MCP 工具
@mcp.tool(
    name="web-search",
    description="Search some web with a topic"
)
async def search(
    topic: str = Field(description="Topic to search"),
    *,
    context: Context
):
    # 发送处理日志(弃用)
    await context.info("Search......")
    # 发送进度信息
    await context.report_progress(20, 100)

    # 模拟网页搜索
    sleep(5)

    await context.info("Writing report......")
    await context.report_progress(70, 100)

    # 模拟 AI 总结
    sleep(5)

    return f"Topic: {topic}, web searching over"
然后编写客户端,新增两个回调处理方法:
python# 进度信息回调处理
async def print_progress_callback(
    self, progress: float, total: float | None, message: str | None
):
    if total is None:
        percentage = ( progress / total ) * 100
        print(f"Progress: { progress } / { total } ( { percentage:.1f} % )")
    else:
        print(f"Progress: { progress }")

    # 日志信息回调处理
async def logging_callback(
    self, params: types.LoggingMessageNotificationParams
):
    print(f"[LOG][{params.level}] {params.data}")
然后在连接方法里,设置日志处理回调,在工具调用方法里,设置进度回调:
python# 连接服务端
async def connect(self, url: str):
	transport = await self.exit_stack.enter_async_context(
		streamable_http_client(url)
	)
	read, write = transport
	self.session = await self.exit_stack.enter_async_context(
		ClientSession(
			read,
			write,
			# 记得在这里设置 sampling 回调!!!
			sampling_callback=self.sampling_callback,
			# 配置日志的回调处理
			logging_callback=self.logging_callback,
		)
	)
	await self.session.initialize()

# 请求服务端执行工具
async def call_tool(
	self, tool_name: str, tool_input: dict
) -> types.CallToolResult | None:
	if self.session is None:
		return None

	return await self.session.call_tool(
		tool_name,
		tool_input,
		# 配置进度的回调处理
		progress_callback=self.print_progress_callback
	)
最后修改 main 方法,让客户端调用新工具:
pythonasync def main():
    client = MCPAdvanceClient()
    try:
        await client.connect("http://127.0.0.1:8000/mcp")
        print("连接成功!")

        result = await client.call_tool("web-search", {"topic": "Claude Academy"})
        print("\n调用结果:")
        print(result.content[0].text)

    finally:
        await client.cleanup()


if __name__ == "__main__":
    asyncio.run(main())
启动服务端,执行 main 方法,结果:

Roots
Roots(根目录),是一种授予 MCP 服务端访问本地计算机上特定文件和文件夹权限的方式。它的作用有两个,让 MCP 服务端知道它访问本地计算机的那些目录,以及当 MCP 服务端需要访问文件时,判断文件所在目录是否有权限可以给 MCP 服务端访问。
接下来通过这个机制,实现一下文件访问授权功能。
首先,MCP 服务端需要知道自己可以访问那些文件夹,这部分的流程依旧是服务端请求 + 客户端响应的方式。
我们先要给客户端传服务端可以访问端 roots 路径,以便服务端请求获取路径列表时,可以直接返回。编辑客户端,新增这段逻辑
pythonfrom pathlib import Path
from pydantic import FileUrl

class MCPAdvanceClient:
    def __init__(self, root_paths: list[str]) -> None:
        self.session: ClientSession | None = None
        # 转化 Root 对象
        self.roots = self._create_roots(root_paths) if root_paths else []
        self.exit_stack = AsyncExitStack()

    # 将字符串路径转化为 Root 对象
    def _create_roots(self, root_paths: list[str]) -> list[types.Root]:
        roots = []

        for path in root_paths:
            p = Path(path).resolve()
            file_url = FileUrl(f"file://{p}")
            roots.append(types.Root(uri=file_url, name=p.name or "Root"))

        return roots

    # 返回 Root 列表,当服务端请求时,将 Root 列表返回
    async def _handle_list_roots(
        self, context: ClientRequestContext
    ) -> types.ListRootsResult | types.ErrorData:
        return types.ListRootsResult(roots=self.roots)

    # 连接服务端
    async def connect(self, url: str):
        transport = await self.exit_stack.enter_async_context(
            streamable_http_client(url)
        )
        read, write = transport
        self.session = await self.exit_stack.enter_async_context(
            ClientSession(
                read,
                write,
                # 记得在这里设置 sampling 回调!!!
                sampling_callback=self.sampling_callback,
                # 配置日志的回调处理
                logging_callback=self.logging_callback,
                # 配置获取 roots 回调
                list_roots_callback=self._handle_list_roots,
            )
        )
        await self.session.initialize()
客户端初始化时,传入路径字符串列表,在构造函数中,将路径字符串列表转化为 Roots 对象列表。然后新增一个 _handle_list_roots 方法,作为服务端发起请求后的处理回调,作用时返回可访问的 Roots 列表。最后,需要在连接方法中,给 ClientSession 配置 roots 列表请求处理回调。
根据 MCP 规范,所有的 roots 都应具有以
file://开头的 URI。转化时需要注意一下。
服务端主要提供两个工具,一个用于获取 Roots 列表,一个用于读取文件
pythonfrom mcp.server.mcpserver import MCPServer, Context, Sample, Resolve, ListRoots
from mcp.types import SamplingMessage, TextContent, CreateMessageResult, ListRootsResult
from utils import file_url_to_path
from pathlib import Path
import asyncio

# 定义一个解析器,返回 ListRoots() 标记
def get_workspace_roots() -> ListRoots:
    return ListRoots()

# 定义获取 Roots 的工具
@mcp.tool(
    name="root-list",
    description="Get roots list"
)
async def list_roots(
    roots: Annotated[ListRootsResult, Resolve(get_workspace_roots)]
) -> list[str]:
    client_roots = roots.roots

    # 通过 Root 对象中的 uri,将 uri 转化为 Path 对象(这里只是为了返回路径,就转化为str)
    return [str(file_url_to_path(root.uri)) for root in client_roots]

# 确认请求的路径是否允许访问,是否在 roots 中
def is_path_allowed(
    requested_path: Path,
    roots: ListRootsResult,
) -> bool:
    if not requested_path.exists():
        return False
    if requested_path.is_file():
        requested_path = requested_path.parent

    for root in roots.roots:
        root_path = file_url_to_path(root.uri)
        try:
            requested_path.relative_to(root_path)
            return True
        except ValueError:
            continue

    return False

# 读取文件工具
@mcp.tool(
    name="read-file",
    description="Read a file"
)
async def read_file(
    path: str,
    roots: Annotated[ListRootsResult, Resolve(get_workspace_roots)]
) -> str:
    requested_path = Path(path).resolve()

    if not is_path_allowed(requested_path, roots):
        return f"拒绝访问:{path},因为不在允许的根目录范围内"

    return f"允许访问"
为了方便将客户端传过来的 URI 转化为 Path 对象,这里新增一个工具脚本 utils.py
pythonfrom pathlib import Path
from urllib.parse import unquote, urlparse


def file_url_to_path(file_url) -> Path:
    """Convert a file:// URL to a Path object."""
    url_str = str(file_url)
    parsed = urlparse(url_str)
    path = unquote(parsed.path)
    if len(path) > 2 and path[0] == "/" and path[2] == ":":
        path = path[1:]
    return Path(path)
修改一下 main 文件,测试新的 MCP 工具
pythonimport asyncio
from mcp_advance_client import MCPAdvanceClient

# 自定义可访问 roots 目录
root_paths = [
"<写自己的电脑的实际文件夹路径>/mcp_learning/advance/demo_roots/documents",
"<写自己的电脑的实际文件夹路径>/mcp_learning/advance/demo_roots/download",
]

async def main():
    client = MCPAdvanceClient(root_paths=root_paths)
    try:
        await client.connect("http://127.0.0.1:8000/mcp")
        print("连接成功!")

        result = await client.call_tool("root-list", {})
        print("\n调用结果:")
        print(result.content[0].text)

        result = await client.call_tool(
            "read-file",
            {"path": "<写自己的电脑的实际文件夹路径>/mcp_learning/advance/demo_roots/documents/report.txt"}
        )
        print("\n调用结果:")
        print(result.content[0].text)

        result = await client.call_tool(
            "read-file",
            {"path": "<写自己的电脑的实际文件夹路径>/mcp_learning/advance/demo_roots/system/system.conf"}
        )
        print("\n调用结果:")
        print(result.content[0].text)

    finally:
        await client.cleanup()

if __name__ == "__main__":
    asyncio.run(main())
运行测试一下:
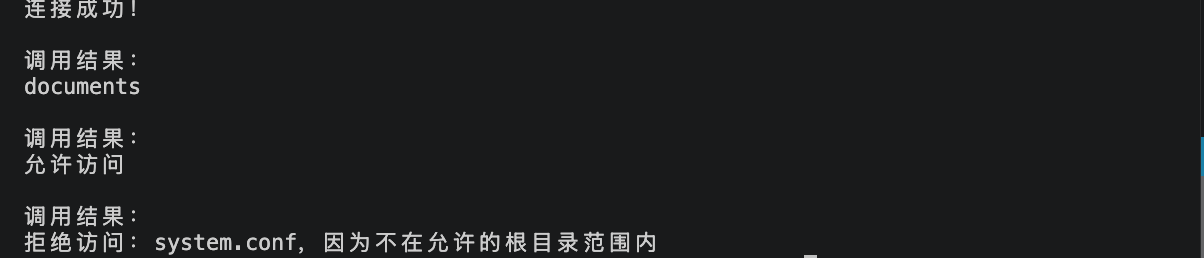
输出内容我处理过,所以没有输出实际路径,安装我上面的代码,一般是输出正确的绝对路径。
传输与通信
JSON 消息类型
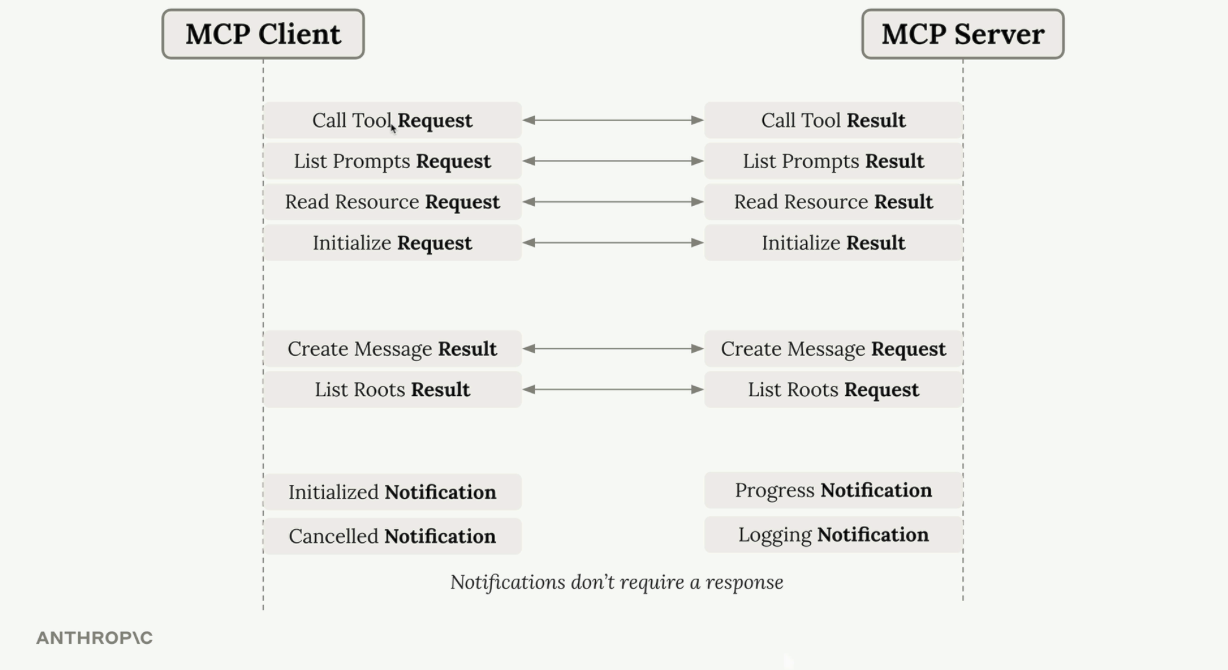
MCP 使用 JSON 消息来处理服务端与客户端之间的通信。通信的消息都有特定的格式与用途,例如:
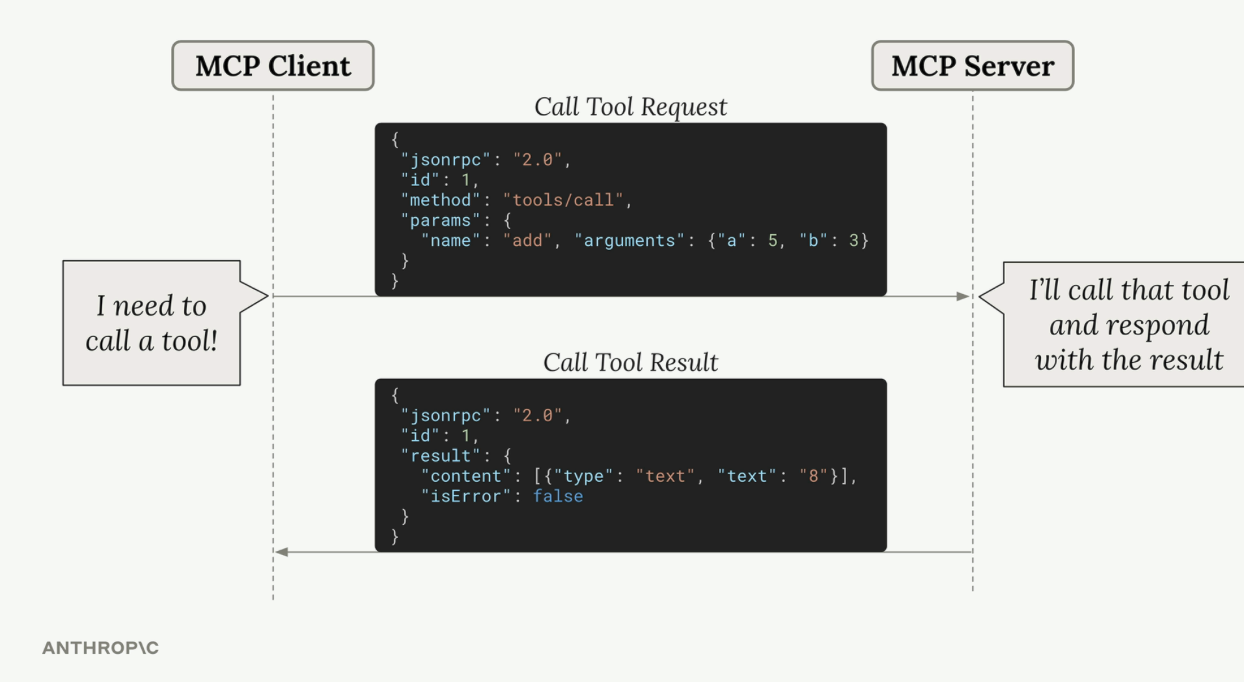
MCP 消息分别分为两大类,一类是请求 - 结果消息,这类消息成对出现,发出一个请求,并且期望得到一个返回结果:
- Call Tool Request → Call Tool Result
- List Prompts Request → List Prompts Result
- Read Resource Request → Read Resource Result
- Initialize Request → Initialize Result
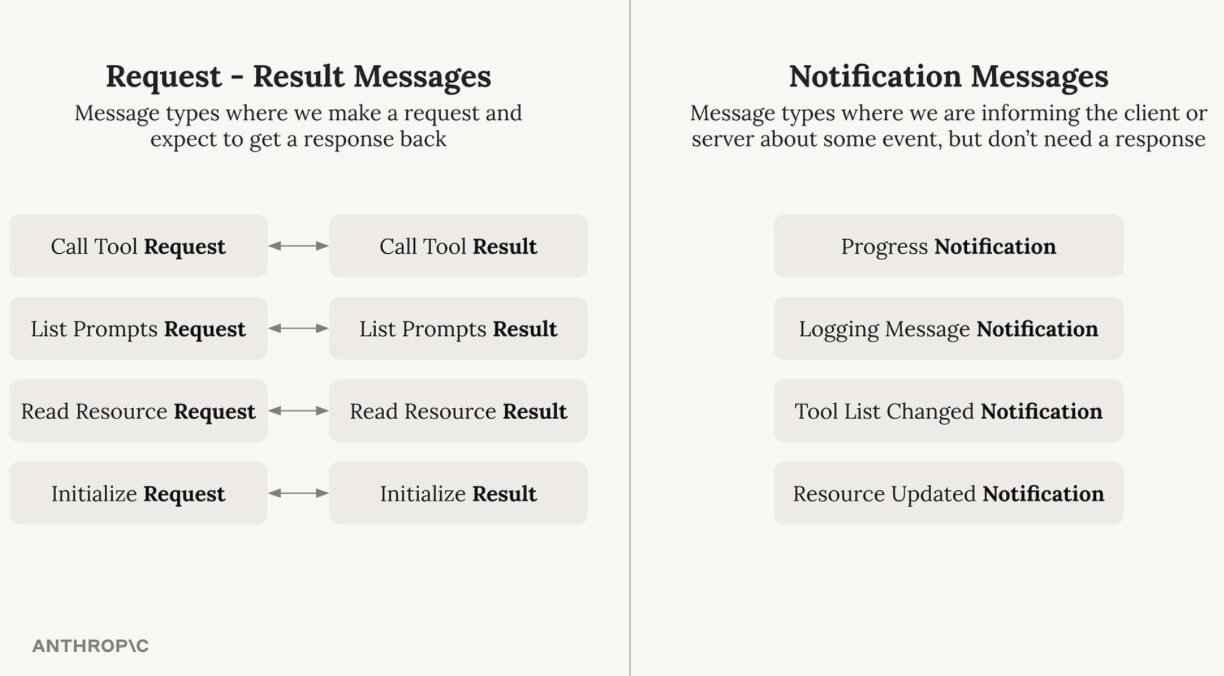
第二类是通知消息,这类消息是单向消息,用于通知事件,但不需要响应:
- Progress Notification(进度通知) - 关于长时间运行操作的更新
- Logging Message Notification(日志消息通知) - 系统日志消息
- Tool List Changed Notification(工具列表变更通知) - 当可用工具发生变化时
- Resource Updated Notification(资源更新通知) - 当资源被修改时
MCP 规范按照发送者来组织消息: 客户端消息包括客户端发送给服务端的请求以及客户端可能发送的通知。 服务端消息包括服务端发送给客户端的请求以及服务端广播的通知。
消息类型与流向如图:
STDIO 传输
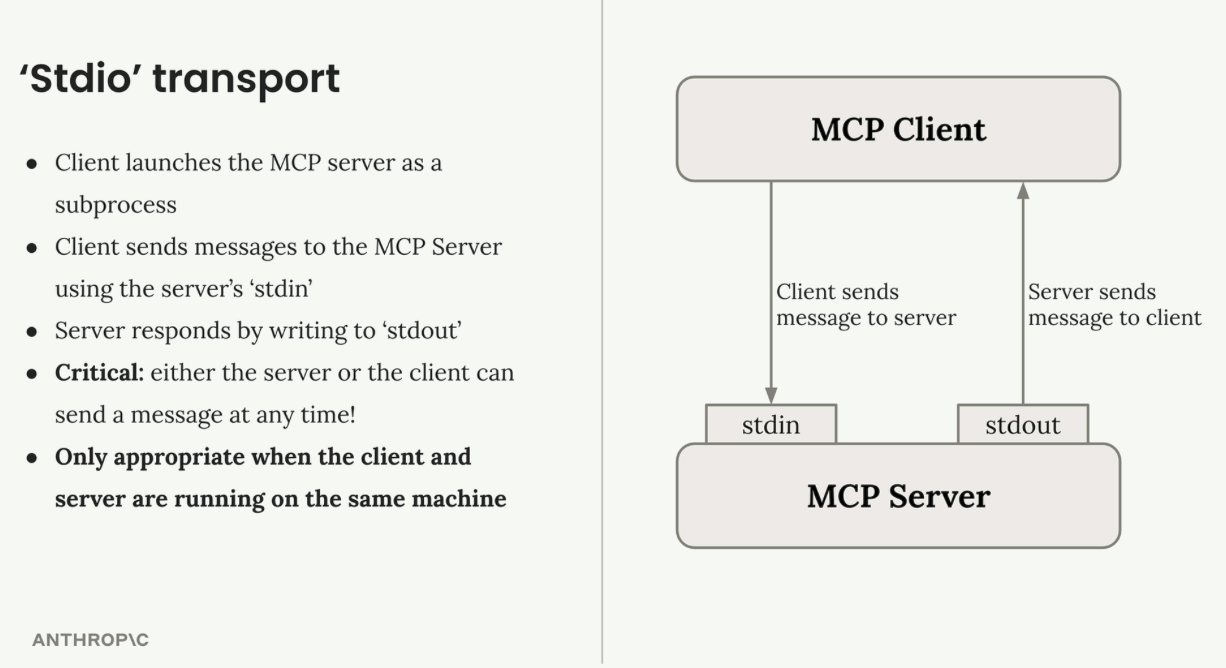
MCP 客户端与服务端消息的通信通道,被称之为传输(Transport)。其实现方式有很多种:HTTP 请求、WebSocket 等等。
STDIO 是一种本地传输方式,这种方式很直接:客户端将 MCP 服务端作为子进程启动,并通过标准输入和标准输出进行通信。其工作原理如下:
- 客户端使用服务端的
stdin向服务端发送消息 - 服务端通过写入
stdout进行响应 - 服务端或客户端都可以随时发送消息
- 仅当客户端和服务端运行在同一台机器上时才有效
MCP 连接的握手方式:
- Initialize Request(初始化请求) - 客户端首先发送此消息
- Initialize Result(初始化结果) - 服务器以其能力进行响应
- Initialized Notification(已初始化通知) - 客户端确认(不期望收到响应)
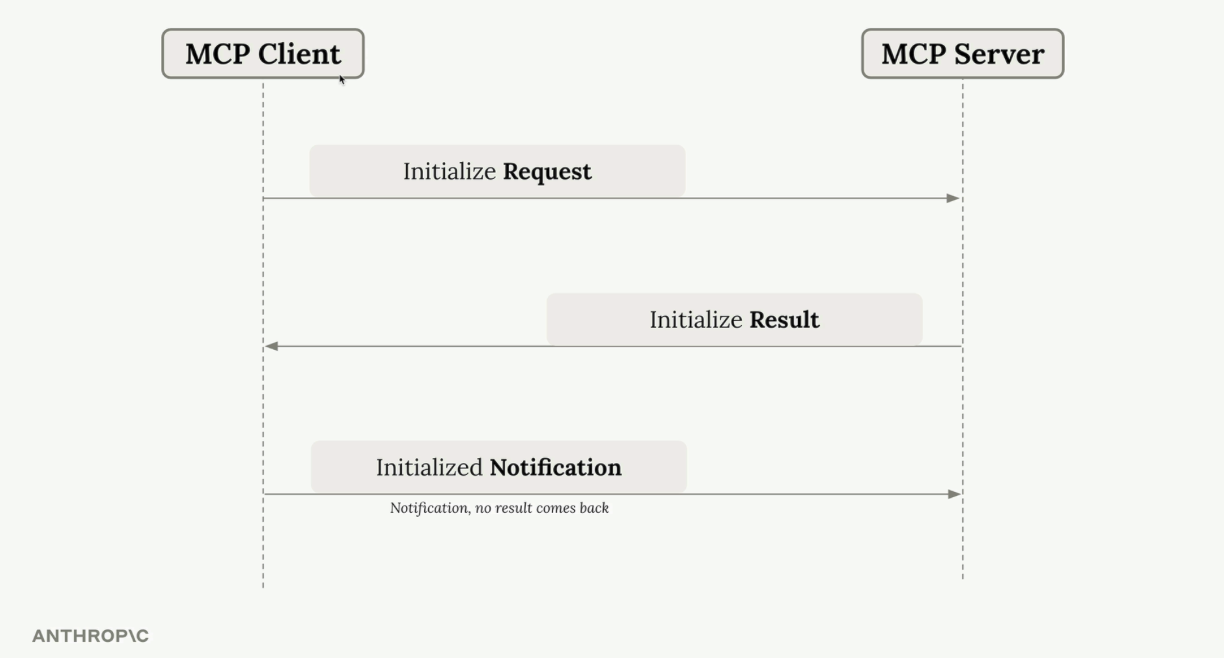
只有完成握手之后,才能进行消息通信。
不论使用哪种传输的方式,都需要处理四种不同的通信场景:
- 客户端 → 服务器请求:客户端写入 stdin
- 服务器 → 客户端响应:服务器写入 stdout
- 服务器 → 客户端请求:服务器写入 stdout
- 客户端 → 服务器响应:客户端写入 stdin
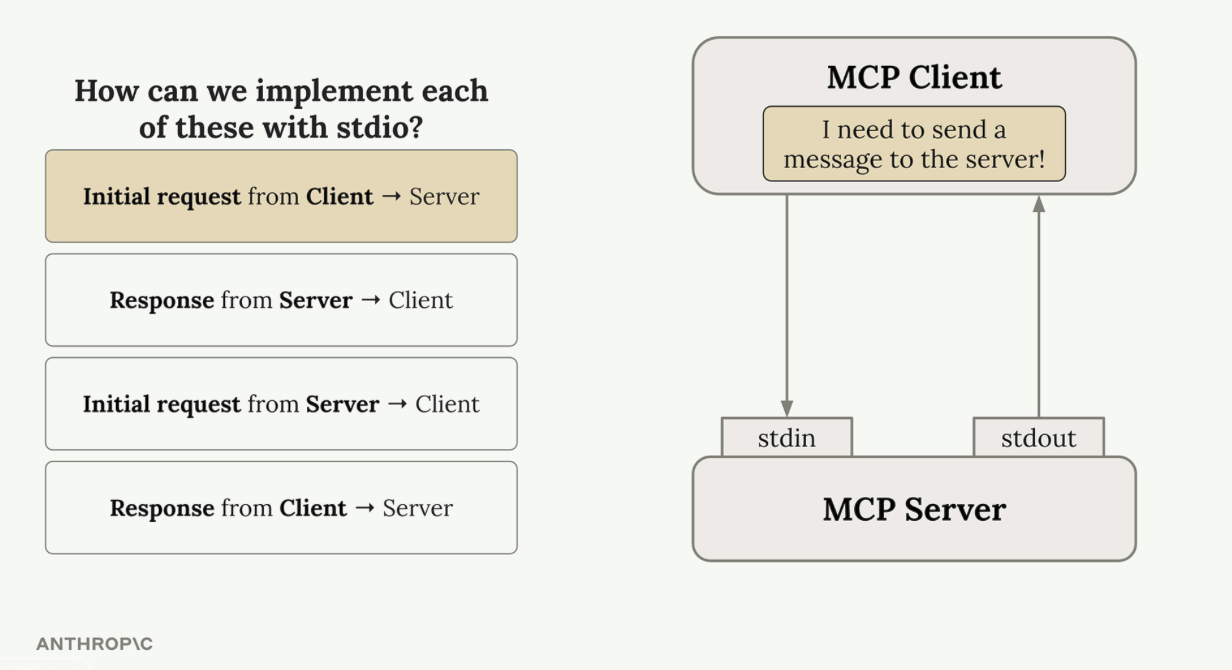
stdio 传输的精妙之处在于其简洁性——任何一方都可以随时使用这两个通道发起通信。
Streamable-Http 传输
在标准的 HTTP 通信中,当客户端使用一个 HTTP 的 URL 访问服务端时,可以非常简单的请求到服务端,服务端也可以根据请求信息,很轻松的响应给客户端。
但是如果反过来,由于客户端没有已知的地址,服务端没有办法请求到客户端,客户端收不到请求,因此没办法响应给服务端。
也就是说,标准的 HTTP 传输中,其通常只能是客户端请求到服务端,而服务端不能请求到客户端。
而 Streamable-Http 传输,提供了一个巧妙的解决方案(Server-Sent Events,SSE)来规避 HTTP 的限制:
- 客户端向服务端发送一个
Initialize Request(初始化请求) - 服务器以包含特殊请求头字段
mcp-session-id的Initialize Result(初始化结果)作为响应 - 客户端发送带有特殊请求头字段
mcp-session-id的Initialize Notification,通知服务端:客户端已连接,以此完成握手。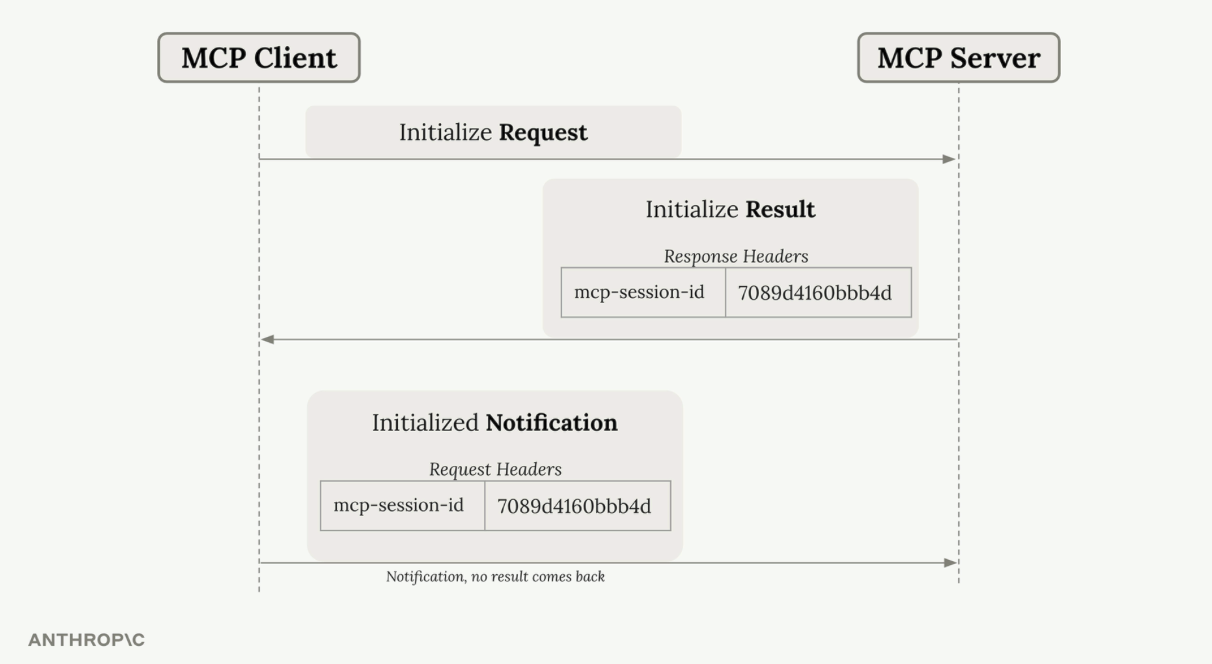
初始化完成后,客户端可以发起一个 GET 请求(带会话 ID),来建立 SSE 连接,这时会创建一个长期存在的 HTTP 响应,服务器可以随时使用它向客户端流式传输消息。
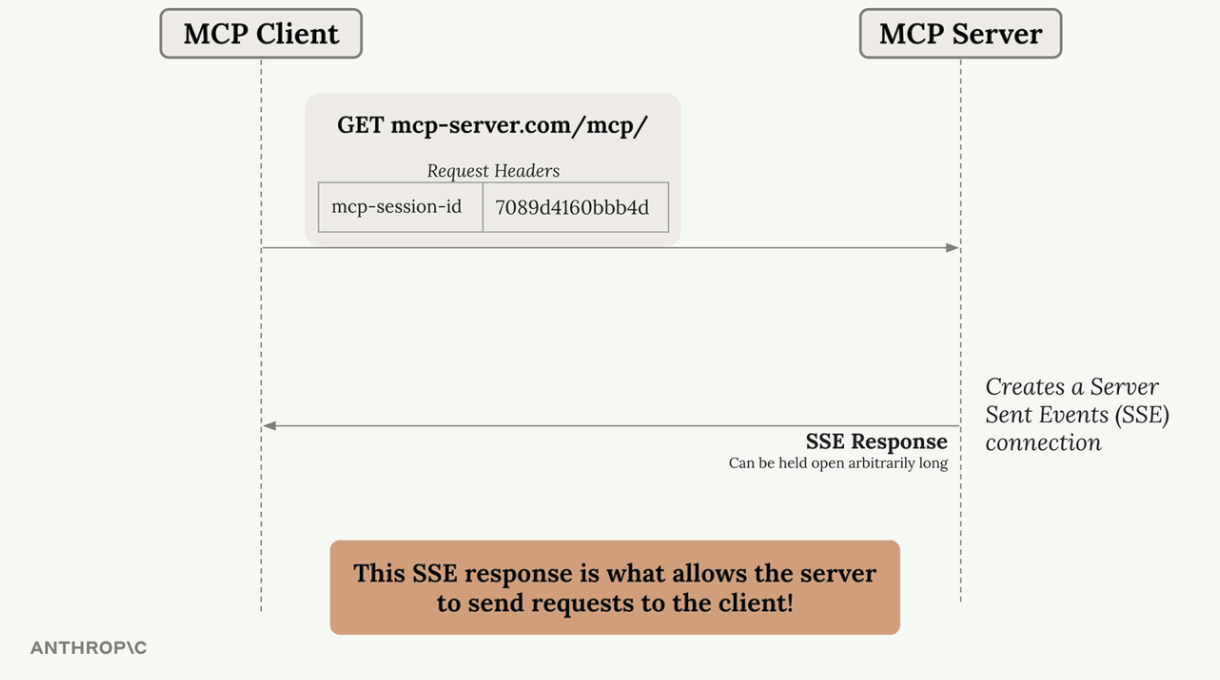
初始化之后,所有的请求都需要会话 ID。
当客户端发起工具调用时,情况会变得更加复杂,系统会自动创建两个独立的 SSE 连接:
- 主 SSE 连接: 用于服务器发起的请求,并无限期保持打开状态
- 工具专用 SSE 连接: 为每次工具调用创建,并在工具结果发送后自动关闭
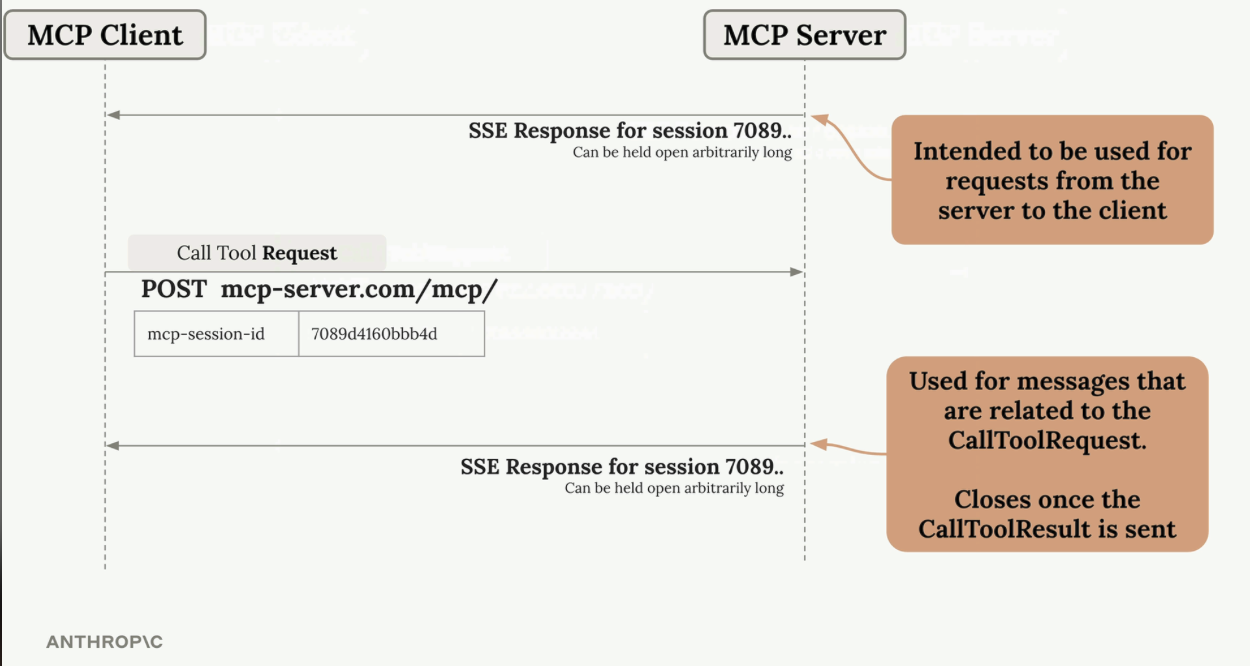
不同的消息类型会通过不同的连接进行路由:
- 进度通知: 通过主 SSE 连接发送
- 日志消息和工具结果: 通过工具专用 SSE 连接发送
当遇到分布式场景时,这种连接方式可能不太适用。如果将 MCP 服务端分布式部署,意味着客户端与服务端之间会有一层负载均衡的中间件。这个中间件的存在,破坏了 SSE 连接,因为你不知道下一次的客户端请求,会被负载均衡打在哪个节点上,而且 SSE 需要客户端和服务端直接进行连接。
为了权衡这种方式,可以启用 stateless_http 和 json_response 的方式来建立 HTTP 连接。这种连接方式有个好处,就是客户端与服务端的连接不再需要握手,可以直接发出请求,等待响应,就像标准 HTTP 请求一样。
但是,当启用 stateless_http 时,会出现以下问题:
- 客户端不会获得会话 ID —— 服务器无法跟踪单个客户端
- 没有服务器到客户端的请求 —— GET SSE 通道变得不可用
- 没有采样 —— 无法使用 Claude 或其他 AI 模型
- 没有进度报告 —— 无法在长时间操作期间发送进度更新
- 没有订阅 —— 无法通知客户端资源更新
json_response 标志的作用,是为了禁用 POST 请求响应的流式传输,也就是 SSE,将响应以纯 JSON 形式返回。
总结
本课程主要深入了 MCP 应用与原理,先上介绍了三种应用方式:
- Sampling:一种允许服务端访问客户端 LLM 的方式
- Logging & Progress:一种允许客户端获取服务端执行日志与进度的方式
- Roots:一种允许服务端获取客户端本机文件访问权限的方式。
然后介绍了 MCP 在传输与通信上的原理。
- MCP 客户端与服务端通过 JSON 进行消息通信。消息格式大致分为:请求 - 响应消息和通知消息,前者是双向的,后者是单向的。
- STDIO 传输是本地调试 MCP 服务端与客户端的一种通信方式。客户端通过子进程方式启动服务端,并通过 Stdin 和 Stdout 的方式来进行消息传输。
- Streamable-Http 是标准 HTTP 传输的一种特殊方式,它通过 SSE 的方式,巧妙解决 HTTP 只能单向传输的问题。客户端和服务端通过一次请求 - 响应消息和一次携带
mcp-sessin-id的通知消息完成握手,客户端再通过 GET 请求让服务端建立 SSE 连接,完成双向连接。 stateless-http传输是为了解决存在负载均衡中间件的分布式 MCP 服务,无法通过 SSE 连接的方式建立双向通信的问题。客户端与服务端的通信不再需要握手,请求不再携带mcp-sessin-id。但缺点是采样、日志进度等等需要服务端向客户端请求的功能均不可用。
再炫耀一下勋章:

附录
课程链接:
我跟做的练习代码: mcp_learning by nongxc123 - Github